Therapeutic Ultrasound for treatment of Blocked Breast Ducts

By Agnes Budyn, Registered Physiotherapist PT, pelvic health certified

Breastfeeding can be a wonderful way of feeding and connecting with your baby. And while there are a lot of benefits to it, there are also a lot of challenges that women often experience. One common challenge is a clogged milk duct which can happen at any point in a woman’s breastfeeding/pumping journey.

Blocked ducts can cause discomfort, and pain, and even lead to more serious complications like mastitis if left untreated.

While traditional remedies often involve warm compresses, massage, or manual expression, there’s a growing interest in therapeutic breast ultrasound as a non-invasive treatment option. In this post, we’ll explore how therapeutic breast ultrasound works, its benefits, and why it might be the right treatment for blocked ducts.

What is a Blocked Milk Duct?

A blocked milk duct occurs when milk flow is obstructed in one of the milk-producing glands of the breast. This typically happens when milk is not fully expressed, causing a buildup that can lead to swelling, pain, and even hard lumps in the breast. Blocked ducts are common in the early stages of breastfeeding, particularly if the baby isn’t latching properly or the breast is not emptied completely during nursing but can happen at any time.

Common symptoms of a blocked duct can include:

  • A lump over the area of the breast where there is a build-up of milk
  • Slower flow or a decrease in milk supply can be common on the affected side
  • Warmth or redness may be present over the affected area accompanied by pain

If a blocked duct is left untreated, it can lead to inflammation and infection, resulting in mastitis — a painful condition that often requires antibiotics. Therefore, it’s important to address a blocked duct as soon as symptoms arise.

Traditional Treatments for Blocked Ducts

The most common treatments for blocked ducts include:

  • Warm compresses: Applying heat to the affected area can help loosen the blockage and encourage milk flow.
  • Gentle massage: Massaging the breast while nursing or pumping can help to manually express milk and relieve the blockage.
  • Frequent feeding or pumping: Ensuring the baby nurses frequently or pumping the affected breast can help to clear the duct and relieve pressure.
  • Position changes during nursing: Different breastfeeding positions can sometimes help to target the area of the blockage more effectively.

However, these methods are not always effective on their own or may take too long to work. This is where therapeutic breast ultrasound comes in.

What is Therapeutic Breast Ultrasound?

Therapeutic breast ultrasound is a conservative treatment that uses sound waves and gentle heat to stimulate the breast tissue and help relieve blocked ducts, kind of like a mini massage to the area! The procedure is often used in physical therapy and has been adapted for blocked ducts where the treatment is performed directly to the affected area on the breast. The vibrations caused by the sound waves can help to break up the blockage by promoting circulation, reducing inflammation, and encouraging milk flow. The treatment is gentle, typically taking about 10-15 minutes per session, and can be done in conjunction with other breast care techniques.

Benefits of Therapeutic Breast Ultrasound for Blocked Ducts

  1. Effective and Non-Invasive: Ultrasound therapy is non-invasive and generally considered safe for breastfeeding mothers. It offers a gentle solution that can be used alongside other methods like breastfeeding or pumping.
  2. Pain Relief: The soothing effects of ultrasound waves can help alleviate the discomfort and pain associated with blocked ducts, allowing mothers to feel more comfortable while continuing to care for their baby.
  3. Faster Recovery: Ultrasound therapy can help clear the blockage more quickly than manual techniques, potentially reducing the risk of developing mastitis or other complications.
  4. No Need for Medication: For mothers who wish to avoid medication or antibiotics, therapeutic ultrasound can be an appealing alternative to address the blockage before it develops into a more serious issue, like an infection.

Is Therapeutic Breast Ultrasound Right for You?

Therapeutic ultrasound can be an effective treatment for many women experiencing blocked ducts, but it’s important to consult with a healthcare provider before starting any treatment. A lactation consultant or a doctor/midwife can help determine if this approach is right for you based on the severity of your blockage and your overall health.

Blocked milk ducts can be a painful and frustrating experience for nursing mothers, but therapeutic breast ultrasound offers a promising, conservative solution to relieve the condition. By promoting circulation, reducing inflammation, and helping to clear the blockage, ultrasound therapy can provide much-needed relief and help mothers continue breastfeeding/pumping comfortably.

If you’re struggling with blocked ducts, consider talking to your healthcare provider about whether therapeutic breast ultrasound could be a beneficial addition to your treatment plan. As always, seek professional advice and support when managing breastfeeding-related concerns to ensure both you and your baby’s health and well-being.

If you are experiencing blocked ducts or want to find out more, please reach out to Agnes, registered physiotherapist, specializing in pelvic health for more information. Click here to book Agnes Budyn:

Agnes Budyn

Physiotherapist – DPT, PT, BSc (Hons) Life Sci
Agnes Budyn is an experienced Pelvic Health Physiotherapist with a special interest in pre and post natal woman’s health. She is now offering Therapeutic Breast Ultrasound at Synergy Sports Medicine and Rehabilitation located at 2155 Danforth Avenue, Toronto.

BOOK AGNES NOW

Why Do We Fall? Mastering the 3 Pillars of Balance

by Jarod Roy, Registered Physiotherapist

Whether recovering from an injury, working on fall prevention, or looking to improve athletic performance, balance plays a vital role in daily life. Good balance reduces the risk of falls, improves coordination, and enhances your ability to move confidently through life. But balance isn’t just about “not falling over”—it’s a complex system built on three key components: visual input, sensory (proprioceptive) feedback, and vestibular function.

Let’s break down what each pillar does and how to strengthen it with simple, practical exercises.

What is Balance?

Balance refers to your body’s ability to maintain its center of gravity over your base of support. It’s a dynamic process, constantly adjusting as you move, shift weight, or respond to your surroundings. This coordination relies on input from three interconnected systems, which rely on the strength of your legs for quick responses in real time:

  1. Visual system – Helps you orient yourself in space by processing what you see.
  2. Sensory system (proprioception) – Provides feedback from muscles, joints, and skin about body position.
  3. Vestibular system – Located in the inner ear, this system detects head movements and helps regulate equilibrium.

Common Signs of Balance Deficits

  • Feeling unsteady when walking, especially on uneven surfaces
  • Dizziness or lightheadedness with head movement
  • Difficulty standing on one leg
  • Increased fear of falling or actual recent falls
  • Trouble navigating in the dark or in busy environments

If you’ve noticed any of these symptoms, working on your balance could make a meaningful difference in your mobility and confidence.

Exercises to Train the Pillars of Balance

Below are targeted exercises to help strengthen each of the three systems. As always, perform exercises safely, using a stable surface or support (such as a wall or chair) as needed.

1. Single-Leg Stance with Eyes Closed

This exercise helps train your reliance on proprioceptive and vestibular cues by removing visual input.

How to Perform:

  • Starting Position: Stand near a sturdy surface or in a corner for safety.
  • Movement:
    • Stand on one leg and close your eyes.
    • Try to hold this position for 15 seconds.
    • Keep your knee slightly bent and your core engaged.
    • Switch sides and repeat.

Repetitions: 2–3 repetitions of 15 seconds per leg.
Tip: If this is too difficult, try it first with your eyes open and progress to eyes closed over time.

2. Head Turns While Walking

This drill provides confusing feedback to the vestibular system, which trains the proprioceptive and visual system, which have to make sense of the environment while the head is moving.

How to Perform:

  • Starting Position: Walk slowly along a hallway or open space.
  • Movement:
    • As you walk, gently turn your head side to side (as if saying “no”) or up and down (as if saying “yes”).
    • Maintain a steady walking pace and upright posture.
    • Try not to stop or lose rhythm as your head moves.

Repetitions: Walk for 15 seconds while turning your head, rest, and repeat 2–3 times.
Tip: Start with slow, controlled head turns. As you improve, increase the speed of movement or try it in more complex environments (like outdoors).

Summary

Balance is a trainable skill, and like any area of performance, it improves with consistent practice and tends to get worse when we aren’t challenging it. Start simple, progress gradually, and be patient with your body as it adapts. Whether you’re walking on uneven ground, stepping off a curb, or chasing after your kids/grandkids, better balance can help you move through life with greater ease and confidence.

If you struggle with balance, want to reduce your risk of injury, and feel more confident doing the things you love, click HERE to book an appointment with our Registered Physiotherapist, Jarod Roy, at Synergy Sports Medicine East on the Danforth! Select the Steady Step assessment and receive a custom management plan to help you achieve your goals.

Jarod Roy

Registered PT, MScPT, BScKin
Jarod Roy is a physiotherapist practicing at Synergy Sports Medicine, 
jarod@synergysportsmedicine.com
T: (416) 551 8715 | F: (647) 349 4866
2155 Danforth Ave, East York | Toronto, ON | M4C 1J7
BOOK JAROD NOW

Plantar Fasciitis: A Pain in the Foot

by Brittany Kafka, Registered Physiotherapist

Plantar fasciitis is one of the most common causes of heel pain, particularly affecting people who spend a lot of time on their feet. Whether you’re an athlete, someone who stands for long hours, or even just dealing with a recent increase in physical activity, plantar fasciitis can be a frustrating condition that can significantly impact←your mobility and quality of life.

What is Plantar Fasciitis?

Plantar fasciitis refers to the inflammation of the plantar fascia, a thick band of tissue that runs along the bottom of your foot, connecting your heel bone to your toes. Its primary function is to support the arch of your foot and absorb the shock created when you walk, run, or stand.

When this tissue becomes irritated or overstretched, it can result in pain—often felt as a sharp, stabbing sensation in the heel, especially with the first steps in the morning or after long periods of rest. The pain typically occurs at the point where the plantar fascia attaches to the heel bone, although it can also radiate toward the arch of the foot.

What Causes Plantar Fasciitis?

The causes of plantar fasciitis are varied, but the most common risk factors include:

  • Overuse or repetitive stress: Activities that put excessive pressure on the feet (running, jumping, or long periods of standing) can strain the plantar fascia.
  • Poor footwear: Shoes that lack proper arch support or cushioning can exacerbate the condition.
  • Foot mechanics: Flat feet, high arches, or abnormal gait patterns can increase strain on the plantar fascia.
  • Tight calves and Achilles tendon: Limited flexibility in the calves and Achilles tendon can alter the mechanics of the foot and increase tension on the plantar fascia.

Symptoms of Plantar Fasciitis

  • Heel pain that’s typically worse with the first steps of the day or after prolonged inactivity.
  • Pain after standing for long periods or after excessive walking or running.
  • Stiffness and tenderness in the heel, particularly in the morning.
  • Swelling or warmth around the heel (though this is not always present).

Strengthening Exercises for Plantar Fasciitis

A combination of stretching and strengthening exercises can help alleviate the symptoms of plantar fasciitis and promote healing. Below are three simple yet effective strengthening exercises to include in your routine. Remember to perform these exercises gradually, especially if you’re experiencing pain.

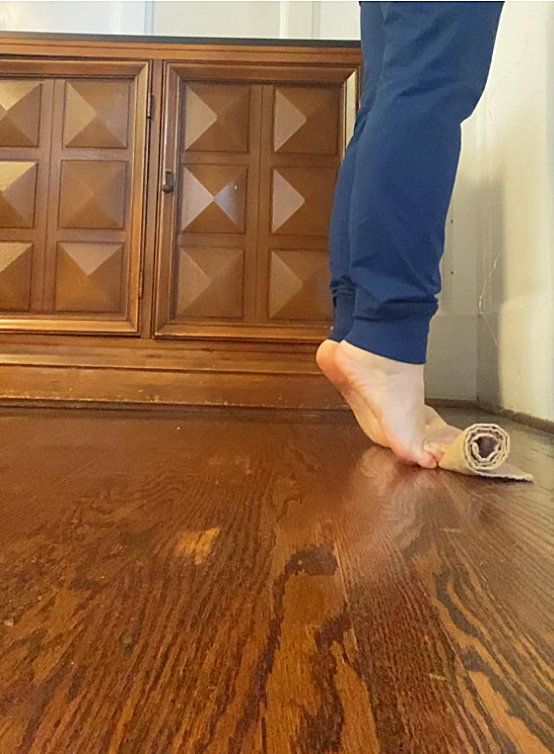
1. Calf Raises with a Towel Under the Toes

This variation of the traditional calf raise helps to target the calf muscles while also improving foot mobility and strength, especially in the muscles that support the arch of the foot. The towel under the toes helps stretch and activate the plantar fascia, which is particularly beneficial for -people dealing with plantar fasciitis.

How to Perform:

Starting Position: Stand with your feet flat on the floor, hip-width apart, and place a small towel (a hand towel works well) or cloth under the toes of both feet.

Movement:

  1. Keeping your toes firmly on the towel, lift your heels off the ground, standing on the balls of your feet. Make sure to engage your calf muscles (the gastrocnemius and soleus muscles) as you raise your heels.
  2. Hold the top position for 1–2 seconds, feeling the stretch through the toes and the arch of the foot.
  3. Slowly lower your heels back down to the floor, maintaining tension in the toes and keeping the towel under your feet.
    Repetitions: Perform 2–3 sets of 10–15 repetitions.

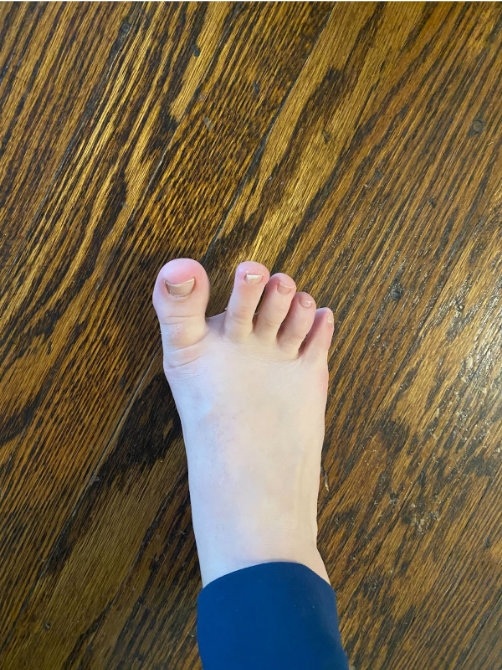
2. Toe Extension & Abduction Combined

This exercise strengthens the muscles responsible for toe movement and foot alignment, focusing on the ability to extend and spread the toes. The combination of extension (lifting the toes) and abduction (spreading the toes apart) challenges the intrinsic muscles of the foot and helps improve overall foot mobility and function.

How to Perform:

Starting Position: Sit with your legs extended in front of you or stand while balancing on your heels.

Movement:

  1. Begin by lifting all your toes upward (toe extension), as if you’re trying to reach the ceiling with your toes. Make sure to lift the toes without curling them downward or using your arch to assist.
  2. While holding the toe extension, try to spread your toes apart (toe abduction). Aim to separate the big toe from the other toes while simultaneously spreading the other toes as far apart as possible.
  3. Hold the extended and abducted position for 3–5 seconds.
  4. Slowly relax your toes and repeat the movement.
    Repetitions: Perform 2–3 sets of 10–15 repetitions.

3. Ankle Inversion with a Band

Ankle inversion is a movement that helps strengthen the muscles on the outside of the lower leg and the foot, specifically targeting the tibialis posterior muscle. Using a resistance band adds extra tension to the movement, increasing the difficulty and helping to build strength and stability around the ankle joint.

How to Perform:

Starting Position: Sit on the floor with your legs extended straight in front of you. Attach a resistance band to a stable object (such as a door or a piece of furniture) and loop the other end around the inside of your foot (on the medial side, near your big toe).

Movement:

  1. Keeping your leg straight, slowly pull your foot inward toward the midline of your body (this is the inversion movement). The resistance band will provide tension as you move your foot inward.
  2. Make sure to focus on controlling the movement as you pull the foot inward, engaging the muscles around your ankle and lower leg.
  3. Hold the end position for 1–2 seconds, then slowly return the foot to the starting position.
    Repetitions: Perform 2–3 sets of 10–15 repetitions on each foot.

Foundational and Classical Pilates Mat Training 2025

Riki Richter

Riki Richter

Dr. Raza Awan

Dr. Raza Awan

Dates: March 14-16, April 25-27, May 23-27, June 20-22, 2025

During this 125 hour in-person teacher training, students will be encouraged to incorporate critical thinking into their understanding of the Pilates Mat Work.

During this course you will learn:

  • To teach movement tailored to your patient
  • Bio-mechanically sound cues
  • To optimize a patient’s movement potential
  • To incorporate current concepts in research

Taught by Riki Richter, Dr. Raza Awan and guest speakers that are leaders in their fields, this course will delve into how to teach in a 1-on-1 setting as well as in various small group environments including a Pilates or yoga studio, and rehabilitative setting.

Who Should Take This Course?

This course is suitable for the following who are looking for exercises to help their patients.

  • Movement Teachers: Pilates and Yoga Teachers, Personal Trainers
  • Rehab Practitioners: Physiotherapists, Chiropractors, Manual Osteopaths, Naturopaths, Acupuncturists
  • Physicians: Family Medicine, Sports Medicine, Orthopaedic Surgeons and Rheumatologists

A movement background or practice, and some anatomy knowledge required.

Riki Richter and Dr. Awan’s staff bios are on the Staff page of this website.

Please fill out the application form online or download PDF and email to synergy@synergysportsmedicine.com.
Limited space available.


It’s Cuffing Season: Time to Put that Rotator Cuff to Work!

by Brittany Kafka, Registered Physiotherapist

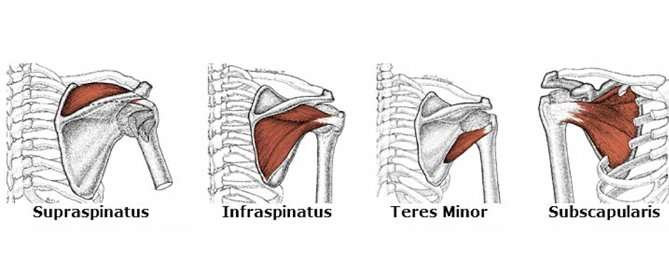
When it comes to keeping your shoulders healthy and pain-free, the rotator cuff often doesn’t get the attention it deserves. This group of four small muscles plays a vital role in stabilizing your shoulder joint, making it essential for everyday movements and overall shoulder health. Strengthening these muscles is crucial for improving your shoulder’s strength and stability and preventing common shoulder injuries.

The Role of the Rotator Cuff

Your rotator cuff consists of four muscles—supraspinatus, infraspinatus, teres minor, and subscapularis—that work together to keep the head of your upper arm bone (humerus) snugly in the shoulder socket (glenoid). They help with movements such as: lifting, rotating, and reaching, and they stabilize your shoulder during these actions. When these muscles are not as strong as we’d like, it can lead to instability, excessive wear and tear, and an increased risk of injuries and pain in the shoulder.

Three Key Exercises for Rotator Cuff Strengthening

1. External Rotation with Resistance Band

How to Do It

  1. Secure a resistance band to a door handle or stable anchor.
  2. Stand sideways to the anchor, holding the band with the arm farthest from it.
  3. Bend your elbow to 90 degrees, keeping it close to your body.
  4. Rotate your forearm outward, away from your body, and slowly return to the starting position.

2. Internal Rotation with Resistance Band

How to Do It

  1. Attach a resistance band to a door handle or secure anchor.
  2. Stand with your side to the anchor, holding the band with the arm closest to it.
  3. Bend your elbow to 90 degrees and keep it close to your side.
  4. Rotate your forearm towards your body, then return to the starting position in a controlled manner.

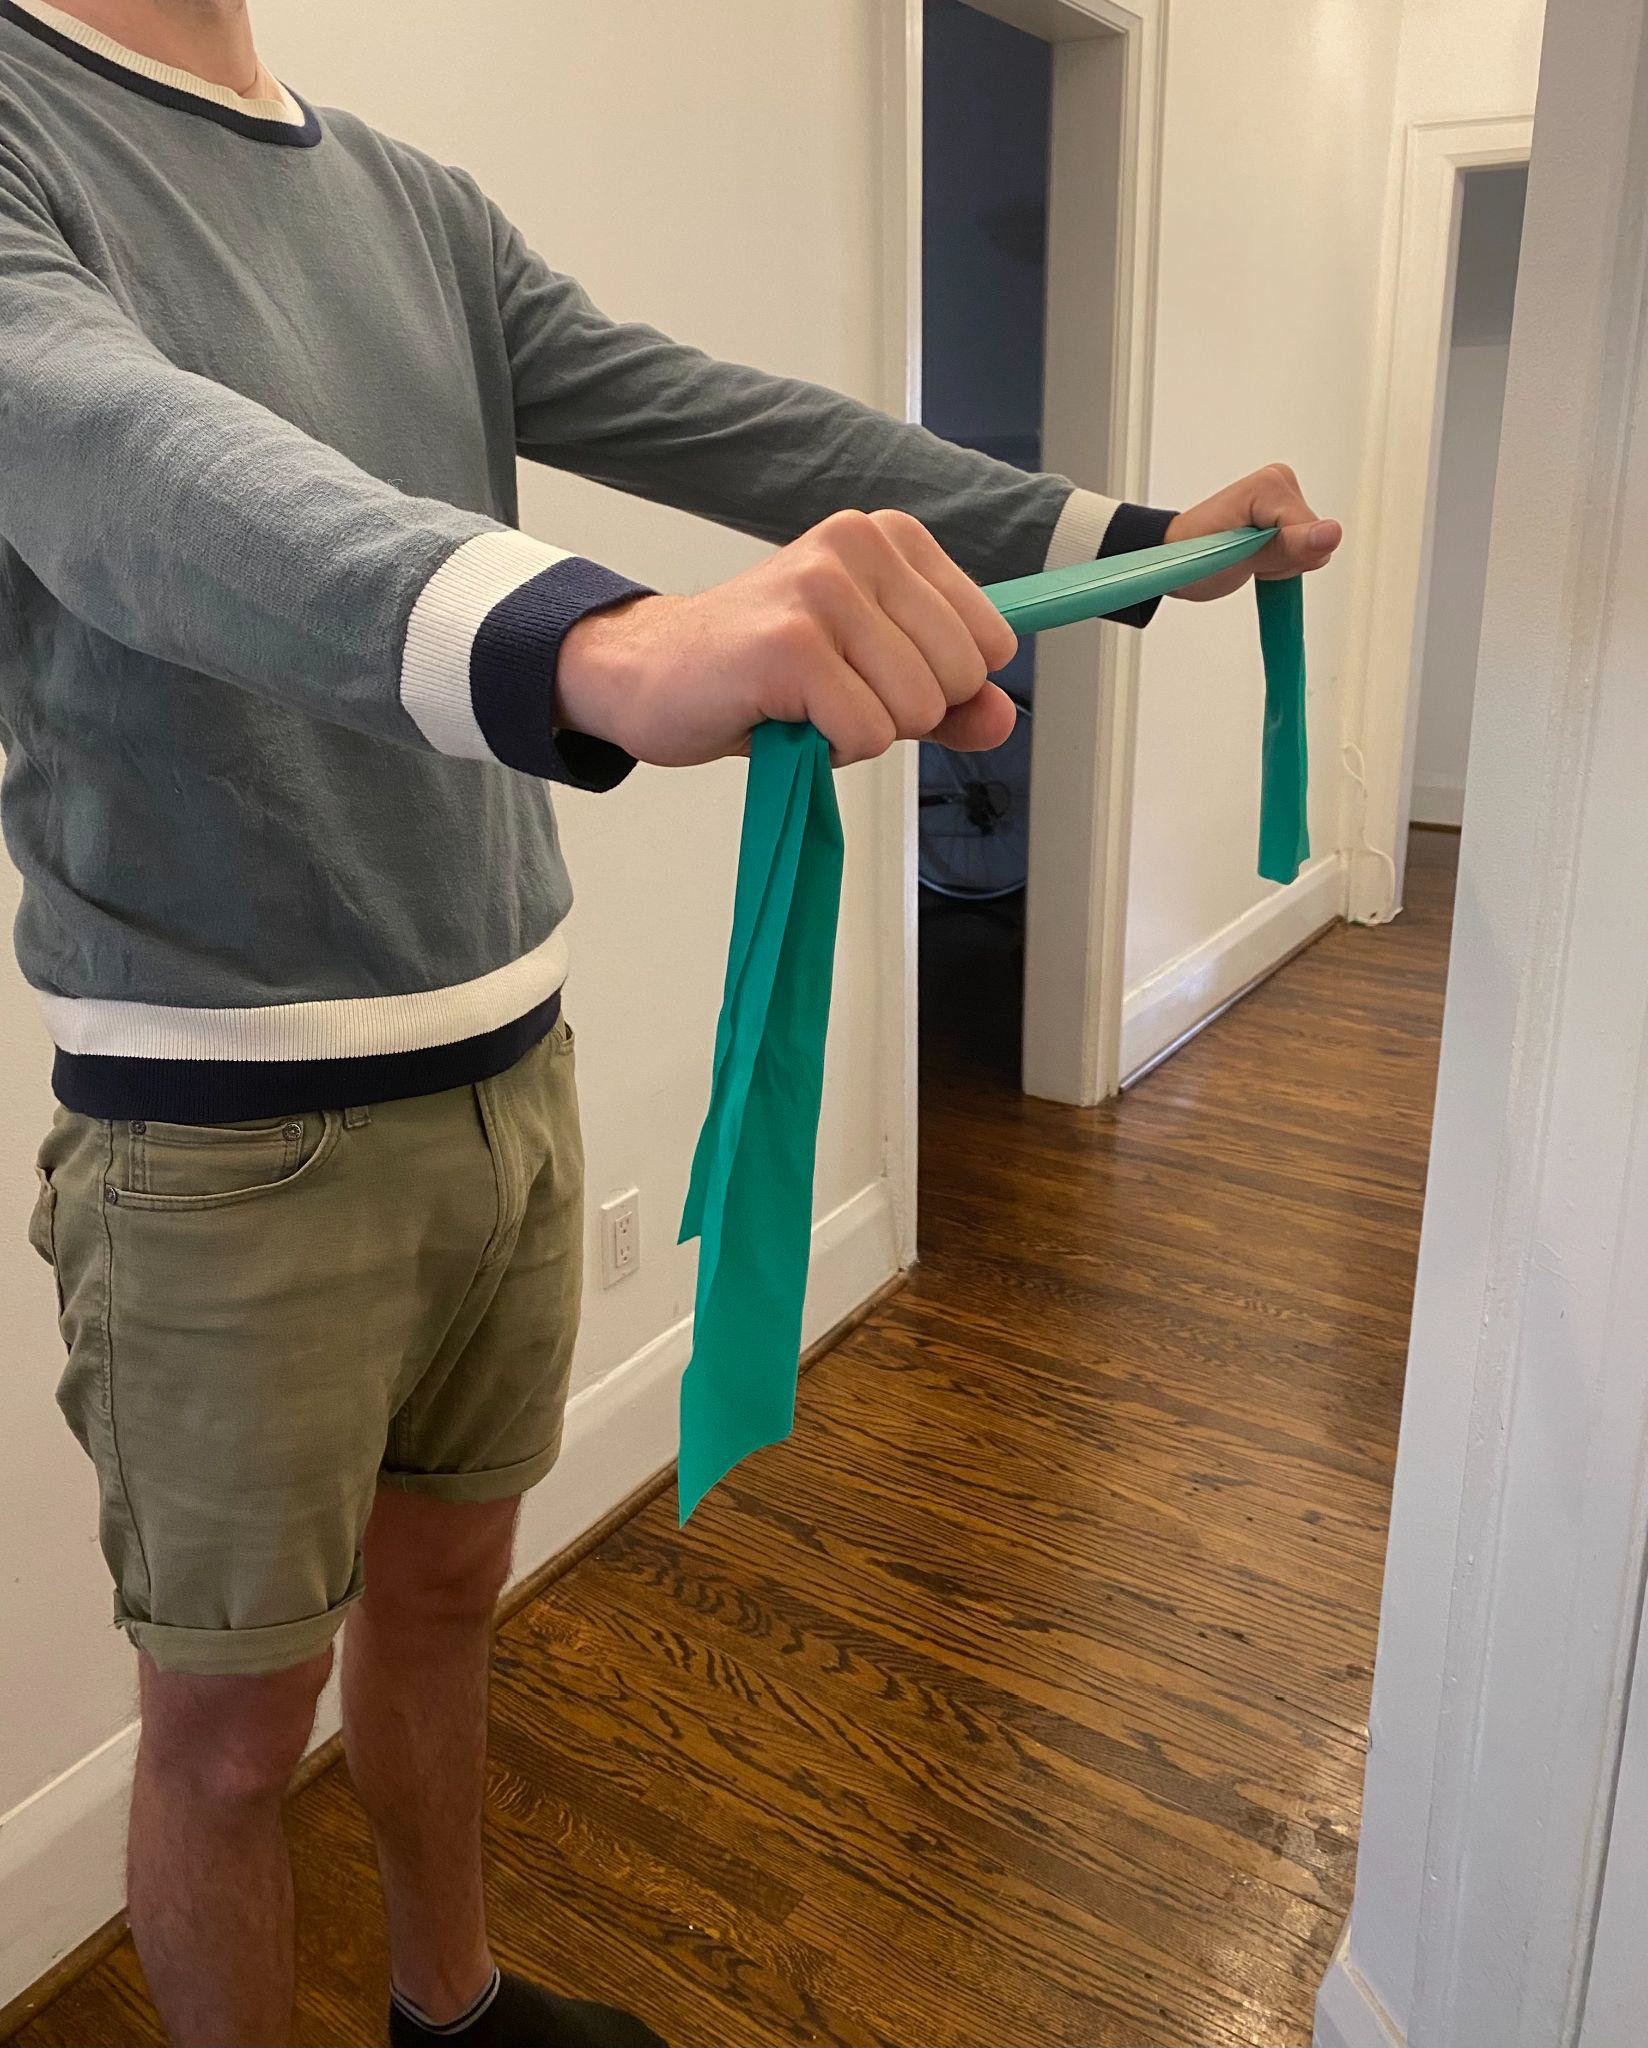
3. Scapular Retraction with Band

How to Do It

  1. Sit or stand with your back straight.
  2. Hold onto a band with your arms outstretched in front of you.
  3. Pinch your shoulder blades together, and pull your arms apart, holding for a few seconds.
  4. Slowly release and repeat.

Next Steps for Shoulder Health

Incorporating these exercises into your routine can significantly enhance your shoulder stability and reduce the risk of injuries. Aim to perform these exercises 2-3 times a week for 10-15 repetitions, gradually increasing the resistance as you get stronger.

Strengthening your rotator cuff is a proactive step towards maintaining shoulder health and preventing injuries. Start these exercises today and keep your shoulders strong, stable, and injury-free!

Tips for Safe Summer Running

by Rachel Varga, Registered Physiotherapist

We have made it! There is no more snow on the ground, the days are longer, and (most days) the sun is shining. What better time of the year than now to lace up the running shoes and hit the pavement?

As exciting as this might sound for lovers of the outdoors and sport, there are still things that need to be considered when exercising in the heat and humidity that comes with this time of year. In this blog post, I would like to share some tips for running in the summer that can make it safe and enjoyable.

1. Protect Yourself: It is essential to be prepared for high temperatures, humidity levels and sun exposure. Appropriate clothing and sun protection can help with this. Wearing loose, moisture-wicking clothing will help control body temperature, and lighter colours will reduce heat absorption from the sun. In addition, putting on sunscreen and wearing sunglasses and/or a baseball cap can reduce the risk of dangerous UV exposure and sunburn.

Always make sure to check the conditions before heading outside! Did you know your body temperature increases by ~10-degrees during a run? Therefore, if the temperature outside is say 20 degrees, plan the run to feel more like 30 degrees after your body acclimates to the combination of physical exertion and outside temperature.

2. Hydration: Staying well-hydrated is so important before, during and after your run. Have 1-2 cups of water before the run, then try to take a drink every 15-20 minutes during the run. However, this is no hard and fast rule. Drink to thirst! Carrying a water bottle or wearing a hydration belt or vest can help with this.

It is also important to consider the increased sweat loss that will happen in the heat. Therefore, consuming an electrolyte drink during, and especially after, will help replenish your stores and promote recovery.

3. Adjust Training: Exertion and heart rate increase when running in higher temperature and humidity levels. Consider slowing down your runs, as well as monitoring your pace and heart rate with a smartwatch or other device. If you can be flexible, try to adjust the time of day you run so you can avoid peak heat, and avoid intense workouts on the hotter and more humid days.

4. Listen to your Body: Heat illness is a potential risk of running outdoors in the summer, so knowing when to stop is critical. Amongst others, some of the signs and symptoms to pay attention to include dizziness, nausea, extreme fatigue, overheating and muscle cramping. However, if there is any cause for concern about running outdoors in the summer, seeking medical advice is recommended.

If you are a runner looking to reduce the risk of injury during the summer season, book an appointment with our Registered Physiotherapist, Rachel Varga, at Synergy Sports Medicine East on the Danforth by clicking HERE!

Rachel VargaRachel Varga

Physiotherapist – B.A. Hons (Kin), MSc.PT
Rachel Varga is a physiotherapist practicing at Synergy Sports Medicine, East End (2017 Danforth Avenue)

BOOK REACHEL NOW

Patellofemoral Pain Syndrome: A Pain in the Knee

by Brittany Kafka, Registered Physiotherapist

​​Pain in the knee can be very common in jumping, running, or other sports, but that does not mean it’s normal. Funny enough, many people who don’t even participate in regular physical activity also suffer from knee pain! Soreness in the front of the kneecap can often be diagnosed as patellofemoral pain syndrome (PFPS).

What is patellofemoral pain syndrome?

This diagnosis simply means pain where the kneecap and upper leg bone meet, and can be caused by a variety of factors. These factors can include: repetitive activities, overuse, a lack of knee stability, decreased ankle mobility, and a lack of strength in the hip muscles. Let’s break down three of the most common causes of patellofemoral pain by taking a look at the knee, hip, and ankle.

At home, here are a few basic things you can start doing to help improve your balance now.

The Knee

Patellofemoral pain can be caused by local factors at the knee, which is often caused by a lack of stability or poor tracking at the knee. For local causes, strengthening the quadricep muscle with exercises such as a straight leg raise or squat variations can be quite helpful. Additionally, focusing on a single leg standing on an uneven surface can be quite effective as well.

The Hip

The glute muscles are the powerhouse of the lower body. If these muscles are not as strong as they could be, this can cause more force to be put through the knee with activity. This repetitive increased force with activity can be a strong contributing factor to patellofemoral pain.

Typically, you want to focus on strengthening the hip extensors and abductor muscles by doing glute bridges with a band above the knee and by doing side lying leg lifts. Try doing each of these exercises for three sets of ten repetitions.

​The Ankle

In order to move effectively, we require a lot of mobility in the ankle. Particularly when it comes to knee pain, ankle dorsiflexion mobility is important. This can be assessed with a knee to wall test. We typically look for a 10 cm distance between the big toe and the wall while touching the knee to the wall and keeping the heel flat to the ground. If the ankle lacks this mobility, this can be another driver of increased force through the knee joint. To improve ankle mobility, turn this assessment into a stretch and try and complete ten repetitions three times a day!

Ultimately, it is important to have pain in the kneecap assessed by a physiotherapist to determine your specific cause and address all necessary factors. This identification is important in prescribing a custom treatment plan to help you get back to the activities you love with less pain.

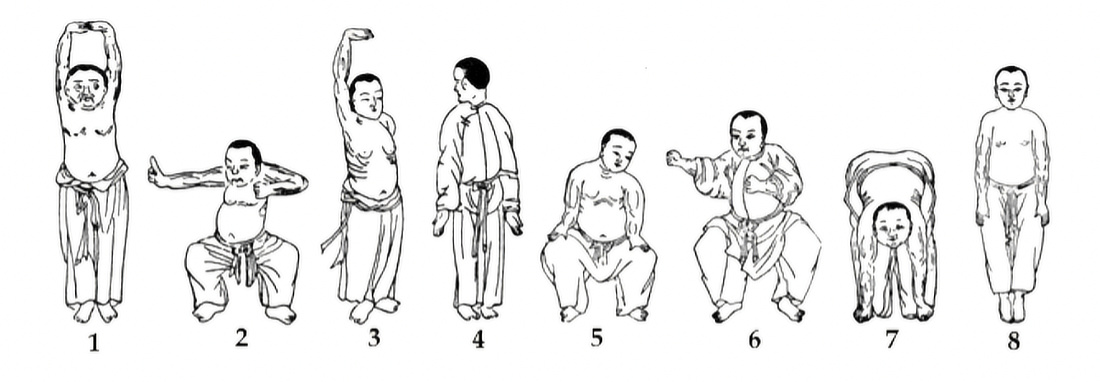
Qi Gong Eight Pieces of Brocade June 16, 2024

  • Date: Sunday, June 16, 2024
  • Time: 10:00 am – 6 pm
  • Location: Synergy Sports Medicine, 235 Wallace Avenue, Toronto
  • Cost: $145 + HST

Qi Gong: The Eight Pieces of Brocade

The practice of Qi Gong involves mindful movement, coordinated breathing, self massage, and gentle muscle engagement to improve mobility, proprioception, and nervous system regulation.

In this workshop, we explore the principles of Qi Gong through a classical movement set known as ‘Eight Pieces of Brocade’. This movement set is largely accessible and easy to learn with an emphasis on spinal mobility, core stability, and unlocking fascial planes.

Matthew Sedo

Matthew Sedo is a registered Acupuncturist at Synergy Sports Medicine with an interest in treating musculoskeletal and stress-related disorders. He holds diplomas in acupuncture and shiatsu therapy for the Shiatsu School of Canada and AIM academy. Matthew is an instructor and clinic supervisor at Humber College and has taught at Eight Branches Academy of Healing and the Ontario College of Traditionals Chinese Medicine. He is certified in Foundational and Classical Pilates Mat training and is currently pursuing a certificate in Rehabilitative Qi Gong and Tai Chi.

Contact Synergy 416-703-3525 to reserve or book now online.

Golfer’s or Pitcher’s Elbow

by Rachel Varga, Registered Physiotherapist

Most of us are probably familiar with, or have heard of, the classic elbow injury known as “Tennis Elbow.” However, did you know that there is another less common, yet equally bothersome injury known as “Golfer’s Elbow” or “Pitcher’s Elbow?” The two injuries are quite similar but are located in different areas and impact separate muscle groups in the forearm. Therefore, they require completely different interventions.

The purpose of this blog post is to elaborate on “Golfer’s/Pitcher’s Elbow”, otherwise known as Medial Epicondylitis. If you would like to learn more about “Tennis Elbow” (Lateral Epicondylalgia), please refer to Synergy Physiotherapist, Rebecca Watson’s blog post: Tennis Elbow Doesn’t Have to Cause a Racquet!

Medial Epicondylitis is an issue that presents as pain on the inside of the elbow at a part of the bone called the medial epicondyle, where the muscles involved attach. It can also sometimes cause tightness in these muscles located on the same side of the forearm as the palm of your hand. The primary muscles affected in this injury are the Flexor Carpi Radialis and the Pronator Teres.

 Flexor Carpi Radialis

 Pronator Teres

These muscles function to flex the wrist (bend the wrist down) and pronate the forearm (turn the forearm to have the palm face down).

Medial Epicondylitis is more often seen in men between the 4th and 6th decade and is caused by activities involving repetitive movement into wrist flexion and forearm pronation. The most common activities this injury occurs in include:

  • Sport: baseball, tennis and golf
  • Occupation: plumber and carpenter

One primary goal of physiotherapy in this type of injury is to work on progressive resistance training for the wrist flexor and forearm pronator muscle groups. Below, two exercises that address these areas are demonstrated.

Wrist Flexion with a Resistance Band

Position yourself in sitting with your forearm supported on a surface, palm facing up, and holding on to a resistance band that is anchored below. Slowly bend your wrist up against the resistance.

Perform 3 sets of 10 repetitions.

Forearm Pronation with a Hammer

Position yourself in sitting with your elbow at your side, arm bent to 90-degrees and holding on to a hammer, palm facing up. Slowly turn your forearm so that your palm faces down.

Perform 3 sets of 10 repetitions.

PLEASE NOTE: These are only general exercise examples and may not be appropriate for everyone. It will be dependent on the severity of the injury and the stage of healing. Therefore, if you are experiencing elbow pain and want to determine the best approach for you to take to heal it, book an appointment with our Registered Physiotherapist, Rachel Varga, at Synergy Sports Medicine East on the Danforth!

Rachel VargaRachel Varga

Physiotherapist – B.A. Hons (Kin), MSc.PT
Rachel Varga is a physiotherapist practicing at Synergy Sports Medicine, East End (2017 Danforth Avenue)

BOOK REACHEL NOW

Finding Your Balance

by Brittany Kafka, Registered Physiotherapist

​We are always trying to achieve balance in our personal and professional lives, but how about your body’s physical ability to balance? Just as balance is essential in the personal and professional domains, it is essential to our health and vitality, especially with aging.

People tend to think that their balance is fixed and that they just have ‘bad balance.’ However, the good news is that balance is malleable and can be improved with practice. Working on your balance would be a great New Year’s Resolution for 2024!

We have two types of balance: static and dynamic. Static balance is your ability to maintain your position in a still posture (i.e. standing on one foot), and dynamic balance is your ability to maintain an upright posture while moving (i.e. walking). Both static and dynamic f balance are important in our daily lives regardless of age. If you want to help prevent falls and injuries, working on balance is instrumental.

At home, here are a few basic things you can start doing to help improve your balance now.

Standing on one leg: Stand in front of a counter or wall, and try to balance on one foot, working up to being able to stand for 30 seconds on each foot 3 times a day. Use the counter or wall as necessary to help.

Tight rope walking: In a narrow hallway, walk as if you’re on a tightrope, touching the heel of the front foot to the toe of the back foot with each step. Use the walls as needed to maintain your balance. Try to do 6 hallway lengths every day.

Reverse Lunges: Start with your feet together, take a step back with one leg, placing your toes down but keeping your heel up. From this position slowly lower down so that both knees are at approximately 90-degree angles. Rise back up, and bring the back foot to meet the front foot. Repeat on the other side. Try and complete 8 times on each side for 2 sets a day.

One’s ability to balance is dependent on several factors including strength, vision, inner ear health, proprioception, mobility, and confidence. Physiotherapy addresses balance improvements through direct practice, proprioception training, strength training, and mobility work as necessary in all populations. As a physiotherapist, we can assess and identify any deficits that may exist and address those specifically with you.

Qi Gong Strategies for Chronic Pain Management January 21, 2024

Claire Turner-Reid

Claire Turner-Reid

Matthew Sedo

Matthew Sedo

  • Date: January 21, 2024
  • Time: 2:30pm – 5 pm
  • Location: Synergy Sports Medicine, 235 Wallace Avenue, Toronto
  • Cost: $70 + HST

Book Online

Qi Gong is a mindful-movement practice and a treatment modality in traditional Chinese medicine. The practice of Qi Gong involves meditative focus, coordinated breathing, self-massage and gentle muscle engagement with the aim of building energy (Qi), improving mobility, proprioception and regulating emotional health. Like Tai Chi, Qi Gong originated in ancient China and has been used to improve health and wellbeing for centuries.

Current research indicates Qi Gong may be helpful in the treatment of persistent pain.
In this workshop, movement educator Clair Turner Reid and acupuncturist Matthew Sedo will be sharing some tools of Qi Gong practice for better self management.

You will learn:

  • Principles, philosophy and benefits of Qi Gong
  • Movements, posture, self-massage and breathing techniques
  • Mindfulness-based approaches to pain management

Qi Gong and Movement Educator- Claire Turner Reid

Claire Turner Reid teaches Axis Syllabus, Dance, and Internal Martial Arts to adults, seniors, and teens. She is a member of Spiritwind Internal Arts where she trains & teaches Qigong, Taijiquan, Baguazhang, and Kung fu. Claire is faculty at the Ontario College of Traditional Chinese Medicine, where she teaches the Medical Qigong Program, and an instructor at the Evergreen Seniors Centre where she shares Qigong, Tai Chi, and Falling negotiation and prevention with seniors. She holds a BFA in Acting from the University of Windsor, a Diploma of Acupuncture from OCTCM Toronto, and is a Certified Teacher with the Axis Syllabus International Research Meshwork. Claire uses movement and healing practices to deepen awareness, honor the integrity of the body, and enrich inter-relational possibilities.

Co-facilitator- Matthew Sedo

Matthew Sedo is a registered Acupuncturist at Synergy Sports Medicine with an interest in treating musculoskeletal and stress-related disorders. He holds diplomas in acupuncture and shiatsu therapy for the Shiatsu School of Canada and AIM academy. Matthew is an instructor and clinic supervisor at Humber College and has taught at Eight Branches Academy of Healing and the Ontario College of Traditionals Chinese Medicine. He is certified in Foundational and Classical Pilates Mat training and is currently pursuing a certificate in Rehabilitative Qi Gong and Tai Chi.

Contact Synergy 416-703-3525 to reserve or Book Online

Just Trying Tibia Honest!

by Rachel Varga, Registered Physiotherapist

Shin splints are an injury also known as medial tibial stress syndrome. It is an issue that presents as pain in the lower leg, running along an area on the tibia (shin) bone known as the posteromedial tibial border. It is most common among people who are involved in repetitive loading activities, such as running and jumping.

Shin splints are considered a pain condition caused by exercise. While we cannot say with absolute certainty what causes shin splints during movement, there are a couple of proposed mechanisms for it, along with many contributing factors.

The first potential mechanism of injury involves a traction, or a “pulling,” force on the tibia (shin) bone from deep muscles in the calf region of the lower leg. These muscles include the soleus, tibialis posterior, and flexor digitorum longus.

Photos showing muscle pull on the tibia bone.

flexor digitorum longus

soleus

tibialis posterior

The second reason might be due to overload on the tibia bone itself. When the bone is exposed to repetitive stress without adequate recovery time, this can create an inability for the bone to repair fully. Con This mismatch between activity and rest can contribute to the prolonged pain and inflammation commonly felt in the shin area.

Research does support the second theory more. Therefore, it is especially important to address the issue as soon as possible to prevent increased bony overload and, in turn, a more significant injury, such as a stress fracture.

Risk factors that might contribute to the development of shin splints include, but are not limited to:

Internal

  • Flat feet or high arches
  • Tight calf muscles
  • Ankle joint weakness
  • Stiff ankles and toes
  • Poor balance

External

  • Training intensity, frequency, and duration
  • Training errors
  • Training surface
  • Footwear
  • Previous injury history

Overall, shin splints are a condition that can be diagnosed clinically following a thorough examination by a physiotherapist. Additionally, it can be effectively treated with conservative care and appropriate, graded exercise loading programs!

If you are someone who thinks they might be dealing with shin splints and want to get to the bottom of what might be causing it, book an appointment with our Registered Physiotherapist, Rachel Varga, at Synergy Sports Medicine East on the Danforth!

Rachel VargaRachel Varga

Physiotherapist – B.A. Hons (Kin), MSc.PT
Rachel Varga is a physiotherapist practicing at Synergy Sports Medicine, East End (2017 Danforth Avenue)

BOOK REACHEL NOW

Physiotherapy Around the World

by Rachel Varga, Registered Physiotherapist

Sometimes, I will work with patients who are making amazing progress in their physiotherapy treatment plan, but then halfway through, they will tell me they are leaving on vacation soon. This can create a strong feeling of worry in the patient, as they will start to question their ability to recover, and whether or not their progress will be halted, or even completely reversed, during their time away.

I just recently finished spending three weeks away traveling Europe and practicing how to navigate incorporating my own exercise and rehabilitation into my busy itinerary. Now that I am back to a regular work routine, I have had some time to both reflect on my own experience, as well as those shared by my patients. As such, I wanted to provide some tips to hopefully make vacation, while in the middle of a physiotherapy treatment plan, feel a bit more manageable.

1. Share the information with your physiotherapist as soon as possible. With this information, your physiotherapist can help build a plan that fits your itinerary, as well as prescribe exercises that are achievable while you are away.

2. Create an itinerary before you go. This allows you to know when you will most likely be able to schedule physiotherapy exercises into your travel.

3. Easy packing. You can always fit an exercise band in your luggage! If not, then you can tie it to your suitcase handle. This could serve the dual purpose of also being a great luggage identifier.
· Side note: I highly recommend having an identifier. As some who also had their luggage lost on their trip for a few days between countries, having something bright and colorful to easily locate your bag is a good thing to have. So, why not an exercise band!

4. Injury prevention. Do research on where you are going and discuss these places with your physiotherapist. What is the terrain like? Will you be logging more than 10,000k steps per day on the cobblestone streets of Europe or on the rocky trails in the West Coast? What activities will you be doing? Hiking? Swimming? Skiing? Dancing? If your physiotherapist has an idea of the environment you will be in, they can help structure a plan for it that is relevant to your injury. Further, they can provide advice and recommendations on footwear, equipment, taping and bracing if needed.

5. Know the mode and duration of travel. If you know you will be sitting in economy for a 12-hour flight, let your physiotherapist help educate you on posture, ergonomics and movement break strategies. Especially, if you know prolonged sitting is an aggravating factor to your injury!

For my last tip:

6. Do not put too much pressure on yourself! Do not feel like a failure if the plan is not followed perfectly. As much as we can do to prepare, there is always a lot of spontaneity while traveling. Sometimes, you get to a place and discover something completely new that you want to fit into your itinerary, or you end up spending more time in one place than you thought you originally would.

Ultimately, you are traveling for a purpose. Whether that is for work, quality time with friends and family, or to have fun and explore new parts of the world on your own, that is not something that is lost on your physiotherapist. This will always be taken into consideration, and we want to be there to help you achieve your goals, no matter what the circumstance might be. Never forget that your physiotherapist will be waiting for your return and will always be excited to continue working with you right where you left off!

Book an appointment with our Registered Physiotherapist, Rachel Varga, at Synergy Sports Medicine East on the Danforth by clicking HERE!

Rachel VargaRachel Varga

Physiotherapist – B.A. Hons (Kin), MSc.PT
Rachel Varga is a physiotherapist practicing at Synergy Sports Medicine, East End (2017 Danforth Avenue)

BOOK REACHEL NOW

Foundational and Classical Pilates Mat Training 2024

Riki Richter

Riki Richter

Dr. Raza Awan

Dr. Raza Awan

Dates: March 1-3, April 5-7, May 3-5, May 31-June 2, 2024

During this 125 hour in-person teacher training, students will be encouraged to incorporate critical thinking into their understanding of the Pilates Mat Work.

During this course you will learn:

  • To teach movement tailored to your patient
  • Bio-mechanically sound cues
  • To optimize a patient’s movement potential
  • To incorporate current concepts in research

Taught by Riki Richter, Dr. Raza Awan and guest speakers that are leaders in their fields, this course will delve into how to teach in a 1-on-1 setting as well as in various small group environments including a Pilates or yoga studio, and rehabilitative setting.

Who Should Take This Course?

This course is suitable for Movement Teachers, Rehab Practitioners and Physicians looking for exercises to help their patients. A movement background or practice, and some anatomy knowledge required. For more information visit www.synergysportsmedicine.com for Riki Richter and Dr. Awan’s staff bios, and the Programs – Workshops and Trainings page for more information about the course. Please fill out the application form online or download PDF and email to synergy@synergysportsmedicine.com.
Limited space available.


Qi Gong Strategies for Chronic Pain Management 2023

Claire Turner-Reid

Claire Turner-Reid

Matthew Sedo

Matthew Sedo

  • Date: July 23, 2023
  • Time: 1:00 – 3:30pm
  • Location: Synergy Sports Medicine, 235 Wallace Avenue, Toronto
  • Cost: $70 + HST

Book Online

Qi Gong is a mindful-movement practice and a treatment modality in traditional Chinese medicine. The practice of Qi Gong involves meditative focus, coordinated breathing, self-massage and gentle muscle engagement with the aim of building energy (Qi), improving mobility, proprioception and regulating emotional health. Like Tai Chi, Qi Gong originated in ancient China and has been used to improve health and wellbeing for centuries.

Current research indicates Qi Gong may be helpful in the treatment of persistent pain.
In this workshop, movement educator Clair Turner Reid and acupuncturist Matthew Sedo will be sharing some tools of Qi Gong practice for better self management.

You will learn:

  • Principles, philosophy and benefits of Qi Gong
  • Movements, posture, self-massage and breathing techniques
  • Mindfulness-based approaches to pain management

Qi Gong and Movement Educator- Claire Turner Reid

Claire Turner Reid teaches Axis Syllabus, Dance, and Internal Martial Arts to adults, seniors, and teens. She is a member of Spiritwind Internal Arts where she trains & teaches Qigong, Taijiquan, Baguazhang, and Kung fu. Claire is faculty at the Ontario College of Traditional Chinese Medicine, where she teaches the Medical Qigong Program, and an instructor at the Evergreen Seniors Centre where she shares Qigong, Tai Chi, and Falling negotiation and prevention with seniors. She holds a BFA in Acting from the University of Windsor, a Diploma of Acupuncture from OCTCM Toronto, and is a Certified Teacher with the Axis Syllabus International Research Meshwork. Claire uses movement and healing practices to deepen awareness, honor the integrity of the body, and enrich inter-relational possibilities.

Co-facilitator- Matthew Sedo

Matthew Sedo is a registered Acupuncturist at Synergy Sports Medicine with an interest in treating musculoskeletal and stress-related disorders. He holds diplomas in acupuncture and shiatsu therapy for the Shiatsu School of Canada and AIM academy. Matthew is an instructor and clinic supervisor at Humber College and has taught at Eight Branches Academy of Healing and the Ontario College of Traditionals Chinese Medicine. He is certified in Foundational and Classical Pilates Mat training and is currently pursuing a certificate in Rehabilitative Qi Gong and Tai Chi.

How Much Is Too Much?

by Leah Forestall

Have you ever thought about how your exercise frequency and intensity may be impacting how your body feels? Maybe not! We often pick up new things (especially as the seasons change) and don’t think twice about it. However, how we manage our change in movement is very important for injury risk reduction.

Often we see injuries in the clinic that don’t have a mechanism of injury (e.g. a fall, an accident, etc). Usually for these people there is a load error at play. AKA doing too much too quickly or too many new things all at once. This can be anything from shoveling all weekend after having not picked up a shovel in 9 months to increasing your running from 0 km a week to 15 km a week.

Our body often needs time to adapt and adjust to changes in the demands we put through it. Think of when you first get in a hot bath – our body often feels shocked at the temperature but after a moment or two we adapt and get used to it. This is similar to exercise, sport, and activity. If we give ourselves enough time, with appropriate exposure, our tissues can often build up the strength and resilience they need for us to avoid an overuse or acute injury!

Here are a few tips on how to reduce your injury risk when starting a new movement or activity:

  1. Start low and go slow – It’s easier to start with less and add more as you feel you can handle your new desired activities. If you feel soreness after your new movement, this is normal. But if the soreness persists beyond 2 days post exercise that may have been too much. Next time, try a bit less (a shorter workout, less weight).
  2. Follow the 10% rule – An easy rule of thumb is to think of increasing your load by ~ 10% each week. For example, if you are starting weight lifting or running, increase the weight of your bench press or run mileage by ~10% each week.
  3. Give yourself break days – When starting new activities it’s important to give yourself rest and recovery days. Think of scheduling a day or two off after the day you do your new activity. As you start to get used to your new movements you can increase your weekly frequency.
  4. Keep it spicy – Despite starting a new activity ensure you keep your movements and activities spiced up and not all the same. Variety in your movements will help you avoid overuse injuries!

Leah ForrestallLeah Forrestall

BSc Kin, MSc PT Pelvic Health Therapist
Book an assessment with Leah at Synergy Sports Medicine, East End (2017 Danforth Avenue)

BOOK LEAH NOW

The Role of Prehab on Your Road Back From Surgery

by Samy Shash

Picture this – you’ve just left your fracture clinic appointment and the results are in: full-thickness ACL tear. Your surgeon books you in for surgery, but due to hospital backlog, you won’t be getting your operation for several months. You sit in dismay wondering how you will get by without getting your ligament repaired. You’ve already heard the stories about the long, arduous road to recovery and wonder how this process will go for you when you’ll be stuck walking on crutches playing the waiting game. Luckily, there is a solution already waiting for you.

Prehabilitation or “prehab” is a proactive approach to preparing your body for the surgical procedure you will be undergoing. It is a type of physical therapy program designed to improve and enhance your postoperative recovery and reduce your risk of complications.

Prehab can help with:

  1. Strengthening your muscles. Studies show that the number one factor for a successful recovery after ACL surgery is restoring full quadriceps strength. Maintaining and improving your strength before surgery will ensure your post-operative rehab can get started on the right foot.
  2. Improving your flexibility and range of motion. By preventing scar tissue and stiffness from settling in after your surgery, you can ensure your surgeons can operate with the least possible toll on your joint. Moreover, prehab can also help reduce your pain and swelling immediately after your injury, which can ultimately prepare you better for surgery.
  3. Mentally preparing for surgery. Going into surgery can be daunting, and prehab can help ease your anxiety by giving you a sense of control over your recovery. It will also provide you with a preview of how your post-operative rehab will go.

It’s important to note that prehab is not just for athletes or people who are already in good physical shape. Even if you have a sedentary lifestyle, or if you are older, prehab can help you prepare for surgery and reduce your risk of post-operative complications. Anyone, of any age and activity level can improve on their strength and mobility after an injury. Prehab can be done before a hip or knee replacement, ACL reconstruction, meniscus repair, and various other procedures.

Samy Shash

If you have an upcoming surgery and want to prepare yourself mentally and physically as effectively as possible, book an assessment with our physiotherapist Samy Shash at Synergy Sports Medicine, East End (2017 Danforth Avenue)

BOOK SAMY NOW

A Real Pain in the Butt!

by Rachel Varga, Registered Physiotherapist

Located deep in the buttock region, underneath the gluteus maximus muscle, lies a mystery muscle called the piriformis. The piriformis muscle has attachments that run from the sacrum (a bone that is part of the pelvis) to the top of the femur (the thigh bone). Its primary function is to rotate the hip and leg outward.

I refer to this muscle as a real pain in the butt, as it can often be the source of a lot of discomfort in the area. One particular condition this muscle can lead to is Piriformis Syndrome.

Piriformis Syndrome is described as a spasm in the piriformis muscle, causing buttock pain. It can be caused by swelling or tightening of the muscle from injury, or from irritation of nearby structures, such as the sacroiliac joint or hip joint. Activities that can lead to this are sitting for prolonged periods and long-distance running.

Typical symptoms of Piriformis Syndrome include decreased range of motion at the hip and a feeling of dull aching pain in the buttock region. The pain experienced can be triggered by:

  • Walking
  • Running
  • Climbing stairs
  • Driving
  • Sitting for a long period of time

An additional problem that can arise from Piriformis Syndrome is irritation of the sciatic nerve. The sciatic nerve runs underneath the piriformis muscle. Therefore, if the piriformis muscle is in spasm, it can put additional pressure on the nerve.

This pressure can lead to more intense symptoms including:

  • Pain that refers down the back of the thigh, sometimes extending into the calf and foot
  • Pins and needles down the leg (“fallen asleep”)

Stretching the piriformis muscle can often help relieve symptoms associated with Piriformis Syndrome. Here are two variations of a piriformis stretch:

Position yourself lying down on your back. Keep the non-exercising leg straight, as you bring your exercising knee to your chest. Then, pull your foot toward your opposite hip.

Hold for 20-30 seconds. Repeat 3 times.


Position yourself lying down on your back with both knees bent. Cross your exercising leg over the non-exercising leg to rest your ankle on the opposite thigh. Then, gently push the exercising knee downward and away from your body.


Hold for 20-30 seconds. Repeat 3 times.

Piriformis Syndrome can sometimes be tricky to diagnose, as it mimics the signs and symptoms of several other neuromuscular conditions in the area, including sciatica, lumbar disc herniation, and sacroiliac joint dysfunction. It is important to have this evaluated by a healthcare professional so these other pathologies can be ruled in or out.

If you think you might have Piriformis Syndrome and would benefit from a detailed assessment and treatment plan to manage the issue, book an appointment with our Registered Physiotherapist, Rachel Varga, at Synergy Sports Medicine East on the Danforth by clicking HERE!

Rachel VargaRachel Varga

Physiotherapist – B.A. Hons (Kin), MSc.PT
Rachel Varga is a physiotherapist practicing at Synergy Sports Medicine, East End (2017 Danforth Avenue)

BOOK REACHEL NOW

Tips to Survive Winter Running

by Rachel Varga, Registered Physiotherapist

With lower temperatures, freezing winds and darker days, it is no doubt that running outdoors in the winter can be difficult. No matter how much you love the sport, motivation can be much harder to find. Compared to warmer months, there is a lot more physical and mental preparation that comes with running at this time of year.

Despite this, running in the winter can still be enjoyable. As with any winter sport, it just requires the correct preparation. Here are some tips for running in the winter that might help get that foot out the door.

  1. Layer Up: It is important to protect your body from colder temperatures. Wearing clothing such as long running pants or leggings, and a long sleeve shirt with a jacket or vest can help keep you warm. Accessories such as long socks, head warmers, neck warmers and gloves can also block the wind from biting at those smaller exposed areas.
  2. Stay Hydrated: You might not feel thirsty, but you will still sweat in cold temperatures. In addition, the cold air will take away moisture from your body when you breathe. This is what is happening when you can see your breath in the air.
  3. Warm-Up: Muscles and joints will feel stiff in the cold. You want to ensure blood is flowing and the body is loosened up before getting right into a run. Without a proper warm-up, performance can be impaired and the risk of injury increases. Dynamic warm-up drills followed by a 5-10-minute brisk walk or jog can achieve this. Doing some of the warm-up indoors can also help increase body temperature before stepping outside. HERE is a link to a quick YouTube video that demonstrates several dynamic warm-up examples to choose from (3min 50sec).
  4. Plan the Route: Check the weather beforehand so you can prepare for the temperature and wind chill, and if there is a chance that some streets will be snowy and slippery, try to pick a route that will be clear. It is also important to keep in mind that the days are shorter and darker in the winter, so try and pick a time that you can see what conditions you are up against.
  5. Remember the Goal: Whether it is a race in the spring you are training for, working on improving fitness, or you are just trying to shake off some winter blues, reminding yourself of the purpose behind your running can help keep you motivated.

Something else I always like to remind myself when I am gearing up for a run at this time of year, is that it is always the coldest at the beginning of a run. This can definitely be the hardest part to get through mentally, but if you make it past the first stretch, it should only get easier (and warmer) from there!

Ultimately, do not be hard on yourself. Winter running is not easy! If you are having a difficult time increasing speed or adding on more distance to your run, try to modify, think about what you did achieve, and be proud of yourself for getting out there!

If you are a winter warrior and you are looking to reduce and/or prevent injury risk during running, book an appointment with our Registered Physiotherapist, Rachel Varga, at Synergy Sports Medicine East on the Danforth by clicking HERE!

Rachel VargaRachel Varga

Physiotherapist – B.A. Hons (Kin), MSc.PT
Rachel Varga is a physiotherapist practicing at Synergy Sports Medicine, East End (2017 Danforth Avenue)

BOOK REACHEL NOW

The Importance of Strengthening For Ski Season

by Leah Forrestall, MSc PT, BSc Kin, Physiotherapist

Winter is here and that means winter sports are in full swing! One of the most popular, family friendly winter sports for Toronto folks is downhill skiing. It’s a great activity to get out of the city in the winter months and enjoy the beauty of Canadian winters!

Skiing is one of those activities that can be described as ‘riding a bike’ and our motor memory allows us to pick it up quickly year after year. However, this does not mean we are in the clear of injuries! One of the most common areas of the body we see as physiotherapists get injured in skiers of all levels are knees.

Anything from ligament tears/sprains, broken bones, muscle strains, and bad bruises can occur with downhill skiing. Although accidents in sport cannot be 100% avoided, having a good base is paramount in setting yourself up for the best outcome when accidents do occur. One way you can build a good winter sport base is through strength training the muscles in your core and lower half. This can limit your risk of injury on the hill and also provide you with a great starting point in the event you do need to rehab an injury within the ski season. Being strong and fit will also allow you to enjoy a longer ski day, limiting your fatigue!

The best thing is you don’t need much equipment to quickly run through a knee strengthening circuit. Give these exercises a try with your family and friends to build some core, quad, glute and hamstring strength for this ski season! Aim to run through these exercises 1-2 times per week, 2-3 rounds of each exercise for 8-15 repetitions (per side when applicable). If any of these exercises don’t feel good for you or you have any specific questions come visit us for an appointment on a more individualized strength routine for you! Happy skiing!

Exercise #1 Lateral Lunge: shift your weight sideways into one leg. Push through that leg to then stand back up. Repeat both ways.

Exercise #2 Quad Focused Lunge: push through the front leg, allow your knee to go over your toe slightly. Repeat both sides.

Exercise #3 Single Leg Squat: keep your planted leg stable as you push through it to stand up. Lower slow with control. Repeat both sides.

Exercise #4 Copenhagen Side Plank: Get in a side plank and raise your bottom leg up and down while keeping your core in control and trunk stable. Do both sides.

Exercise #4 Copenhagen Side Plank: Get in a side plank and raise your bottom leg up and down while keeping your core in control and trunk stable. Do both sides.

Leah ForrestallLeah Forrestall

Physiotherapist – B.A. Hons (Kin), MSc.PT
Leah Forrestall is a physiotherapist practicing at Synergy Sports Medicine, East End (2017 Danforth Avenue)

Book Now

New Year, New Me

by Rebecca Watson, Registered Physiotherapist

As we’re rolling into the new year, it can be time for many to set new resolutions for themselves – often centered around fitness and health! However, it can also be challenging to stay motivated and maintain a new exercise program. Many people tend to fall out of their new routine almost as soon as they start it, which is especially true during the coldest months of the year. It’s often much easier to stay home curled up in front of the television and tell ourselves that we’ll be more active again ‘once the weather is nicer’ or ‘starting again on Monday’. Surely there must be a better way to go about making the transition into a more active lifestyle… but it can be overwhelming trying to figure out where to start! Here we’ll dive deeper into a few things to keep in mind when creating goals for physical activity and strategies for helping you maintain these resolutions to shift towards a healthier lifestyle.

An important area to consider is goal setting – how do we set realistic and achievable goals for ourselves? Let’s take a closer look at each step of the SMART goals framework and how you can use this handy acronym to help you create a plan that’s best suited to your lifestyle.

Specific 

Designing your goals in a specific way can make you more likely to accomplish them. For example, saying that “I will take the stairs every day at work rather than using the elevator” is much more specific than a general statement such as “I will be more physically active”.

Measurable

Consider what outcomes you can use to measure whether or not you are reaching your goals. For example, creating a movement goal that for the next 30 days you will walk for half an hour per day at a brisk pace (measured by speed, distance, or heart rate).

Attainable 

It is important to set goals that are realistically achievable within a given timeframe. If our goals are not attainable, they can seem intimidating and we are much less likely to achieve them.

Relevant

Set goals that are relevant to your needs and lifestyle! If you personally don’t enjoy running as a form of physical activity, don’t set a goal that you will run every day in the new year. Choose activities that you enjoy and are relevant to your personal fitness goals. In doing so, you will be much more likely to see it through.

Timely

Specific a timeframe or deadline for which you wish to complete your goals by. This helps hold us accountable to what we’ve set out to do and prioritize our goals, making us less likely to procrastinate.

When setting goals for yourself in the area of physical activity, it is helpful to keep in mind the recommended movement guidelines for Canadian adults (you can access these HERE). According to these guidelines, a healthy 24 hours includes getting 7-9 hours of good quality sleep, reducing sedentary time to 8 hours or less, and integrating regular physical activity throughout the day. This physical activity should include at least 150 minutes of moderate to vigorous physical activity per week, as well as as much light physical activities as possible throughout the day (such as standing or walking). 

It’s especially important to make the mentality shift towards thinking about physical activity goals as a long-term lifestyle change, rather than a short term plan. It can take a little while to form a new habit, but dedication and consistency are the key to making the change to a healthier and more active lifestyle! 

Rebecca Watson

Physiotherapist – MSc.PT, BSc.Kin (Hons)
Rebecca is a physiotherapist practicing at Synergy Sports Medicine, East End (2017 Danforth Avenue)

BOOK REBECCA NOW

Foundational and Classical Pilates Mat Training 2023

Riki Richter

Dr. Raza Awan

March 24-26, April 21-23, May 19-21, June 23-25

During this 125 hour in-person teacher training, students will be encouraged to incorporate critical thinking into their understanding of the Pilates Mat Work.

During this course you will learn:

  • To teach movement tailored to your patient
  • Bio-mechanically sound cues
  • To optimize a patient’s movement potential
  • To incorporate current concepts in research

Taught by Riki Richter, Dr. Raza Awan and guest speakers that are leaders in their fields, this course will delve into how to teach in a 1-on-1 setting as well as in various small group environments including a Pilates or yoga studio, and rehabilitative setting.

Who Should Take This Course?

This course is suitable for the following who are looking for exercises to help their patients.

Movement Teachers: Pilates and Yoga Teachers, Personal Trainers Rehab Practitioners: Physiotherapists, Chiropractors, Manual Osteopaths
Naturopaths, Acupuncturists

Physicians: Family Medicine, Sports Medicine, Orthopaedic Surgeons and Rheumatologists A movement background or practice, and some anatomy knowledge required.

Riki Richter and Dr. Awan’s staff bios are on the Staff page of this website. Please fill out the below application form or if you prefer download the application form as a PDF, fill out & send to synergy@synergysportsmedicine.com.

Dry Needling as a Treatment Technique

by Rachel Varga, MSc.PT, Registered Physiotherapist

Dry needling is a term that might sound intimidating to those who have never heard of this technique before. As such, I wanted to take some time to explain what it is and how it is used in clinical practice, so you can hopefully feel a bit more familiar with it by the time you are finished reading!

Trigger point dry needling is a procedure where an acupuncture needle is inserted into a muscle to treat pain. The part of the muscle that the needle is inserted into is called a “trigger point.” These irritable points are what you might be more familiar with calling a “knot” in the muscle.

Once the needle is inserted into the trigger point, it will elicit a twitch response. A twitch response is what we call an involuntary contraction of the muscle. This occurs when the taut band of tissue is being released at the level of the muscle fibers. It is this release of the trigger point that produces the treatment effect we are hopefully aiming for, which might be to reduce pain, improve joint range of motion, or improve muscle strength and function. The entire process takes no more than a few minutes!

There are many conditions that can be treated with dry needling, including: low back pain, neck pain and headaches, rotator cuff tendinopathy, tennis elbow, Achilles tendinitis, patellar tendinitis, iliotibial band syndrome and shin splints.

In addition, people experiencing acute or chronic local muscle pain, referred muscle pain, range of motion restriction or muscle weakness can also benefit from this treatment technique.

It is important to also note that this is not the sole treatment technique used in a physical therapy session. It is part of a multimodal treatment approach, combined with exercise, education and manual therapy. The physical therapist trained in dry needling will help determine whether or not you are an appropriate candidate for this technique after a thorough assessment.

Overall, using this skill in my practice, I have found it to be very effective in producing positive outcomes in many different patient presentations.

So, if you are interested in learning more about this technique and whether or not you are appropriate for it, book an appointment with me, Registered Physiotherapist, Rachel Varga, at Synergy Sports Medicine East on the Danforth by clicking HERE!

Rachel VargaRachel Varga

Physiotherapist – B.A. Hons (Kin), MSc.PT Rachel Varga is a physiotherapist practicing at Synergy Sports Medicine, East End (2017 Danforth Avenue)

A Cyclist’s Guide to Numb Hands

by Leah Forrestall, Author and Registered Physiotherapist

If you’re new to cycling or a seasoned rider you may have experienced the issue of numb and tingly hands. This can sure be an annoyance, whether it happens early on in your ride or hours in. There can be a number of causes for this so let’s dive into a few and what you can do about it!

  1. Your Neck. As a cyclist, the position on your bike requires you to be slightly head down and leaned forward over the bars. However, that can cause your neck to be slightly tilted back, while looking up to see the road/trail ahead. This causes a hinge through the middle of your neck. Nerves that supply sensation to your arms and hands branch from here and this may cause entrapment and/or irritation of them… thus leading to numbness in the hand.
  2. Your Shoulder/Elbow. Similar to the neck, your arm position over the bars may be impacting how your nerves can sit between your muscles, bones and connective tissue. Especially if you ride for hours, they may not like being in that specific position for long periods. Unhappy nerves lead to numbness and tingling.
  3. Your Wrist. Our wrist and hand position may also be causing compression or irritation of the nerves that supply into the hand and fingers. How you grip your handle bars or how far over the bars may also impact this. Think of when you fall asleep on your arm in bed and wake up not being able to feel your hand… similar idea.

How do I know where the problem is and what should I do?

It can sometimes be difficult to know exactly where a nerve problem originates. That’s why we recommend seeking help from a rehabilitation specialist to better understand your issues and get the help you need to feel your best!

However, a few things you can try are:

  1. Get a professional bike fit done. Especially as a new rider it is important to be comfortable in your saddle. Have someone who has training and knowledge in bike fitting assess and help you here.
  2. Self assess your posture. Do you feel overly hunched on your bike or in an awkward position? Do you already have postural issues from your desk job and are hunched over all day? Adjusting your posture on the bike may be all you need to decrease irritation of the nerves. Try working on some postural exercises in your free time (chest openers, pec stretching, foam rolling your upper back, banded rows, core work, etc.)
  3. Try nerve flossing! One thing that helps calm nerves down if they are irritated or compressed is to floss ‘em! This idea is that we are naturally moving the nerves through their pathway to settle them down. There are many ways to do this but here are two versions to try. (aim for 10 passes, 5-10 times per day. The numbness/tingling/nerve pain should improve).

Option 1: Keep your palm up to the ceiling. Start with your head in neutral and as you extend your arm out, bend your neck to the affected side. Come back to the starting position and repeat.

Option 2: Start by making the OK sign with your fingers. As you reach your arm out, maintain the OK sign as you side bend you head towards the affected side. Return to the starting position and repeat.

Keep in mind there are many other causes of numbness and tingling into the hand and if the above things do not resolve your issue be sure to seek out individualized advice. Everyone is different and what works for one may not work for all!

Leah ForrestallYou can book with author and Registered Physiotherapist, Leah Forrestall, through our website HERE or by calling the clinic at 416-551-8715. ​

Running & the Importance of Single Leg Strength

by Rachel Varga, MSc.PT, Registered Physiotherapist

If you are a runner, a very important feature you should be incorporating into your running program is strength training. In particular, single leg strength training.

Running is a high impact sport, and it is predominately a single leg activity. If you think about it, there is only one foot in contact with the ground the majority of the time when running! Therefore, strength training that focuses on single leg exercises can be beneficial for many reasons. Some of these benefits include:

  • Correct muscle imbalances and avoid overcompensation from one leg
  • Prevent fatigue
  • Improve balance and coordination
  • Lower injury risk

Single leg exercises can also optimize regular strength training, which is important to increase force production and promote faster running.

Ultimately, single leg strength training will mimic the demands required in this sport, and in the long run (pun intended), improve overall performance.

I would recommend adding these into your running program two days per week. Here are three of my favourite single leg strengthening exercises:

Single Leg Hip Thrust

Position yourself with your upper back and shoulders rested on a bench and feet flat on the ground. Lift your non-exercising leg so it is crossed over the exercising leg. Then, push through the heel of your exercising leg, to lift your hips and buttocks up.
10 repetitions, 3 sets, 2x/week.

Elevated Split Squat

Position yourself standing on your exercising leg and place the other foot on a chair or other low surface. Then, bend your knee to lower your body towards the floor.

10 repetitions, 3 sets, 2x/week.

Step-Up

Position yourself in front of a step. Step up first with your exercising leg. Once on the step, focus on pushing through the heel of your exercising foot to bring up the non- exercising leg as well. Then, keeping your exercising leg on the step, bring the non-exercising foot back down off of the step behind you.

10 repetitions, 3 sets, 2x/week.

Rachel VargaIf you are a runner who is looking to increase strength, correct muscle imbalances, and ultimately prevent injury during the sport, book an appointment with our Registered Physiotherapist, Rachel Varga, at Synergy Sports Medicine East on the Danforth by clicking HERE!

Rachel Varga

Physiotherapist – B.A. Hons (Kin), MSc.PT
Rachel Varga is a physiotherapist practicing at Synergy Sports Medicine, East End (2017 Danforth Avenue)

Foundational and Classical Pilates Mat Training 2022

June 17, 18, 19, / July 8, 9, 10, 15, 16, 17, Aug 5, 6, 7

During this 125 hour in-person teacher training, students will be encouraged to incorporate critical thinking into their understanding of the Pilates Mat Work.

During this course you will learn:

  • To teach movement tailored to your patient
  • Bio-mechanically sound cues
  • To optimize a patient’s movement potential
  • To incorporate current concepts in research

Taught by Riki Richter and guest speakers that are leaders in their fields, this course will delve into how to teach in a 1-on-1 setting as well as in various small group environments including in a Pilates studio, rehabilitative setting and a yoga studio.

Riki Richter D.O.M.P.,D.Sc.O.

Movement Therapy Director at Synergy Sports Medicine

Riki has been teaching Pilates for 27 years and has taught anatomy for numerous teacher trainings. At Synergy, along with Dr. Raza Awan, she developed protocols used in their “Movement Based Rehabilitation” model. She is an osteopathic manual practitioner that teaches patient specific movement. A movement background and some anatomy knowledge required. Limited space available. For more information email: synergy@synergysportsmedicine.com

Why Should I Strength Train as a Runner?

by Leah Forrestall

Running season and nicer weather are officially here! So now might be a great time to reflect on what your running routine entails! Many runners, both leisure and semi-competitive, don’t include strength training into their exercise routine! If this sounds like you, keep reading…

Strength training is an extremely important component for becoming a better, stronger, and faster runner. Contrary to what many believe, strength training will not make you ‘heavier’ or ‘slower’ and can in fact do the opposite by aiding in power production while you run. Including strength training as a runner is also paramount in preventing running-related overuse injuries, which can creep up throughout your training season.

Overuse injuries occur when the tissues in our body can no longer withstand the load we are placing on them. This can happen for a number of reasons including load error (doing too much too quick), change in environment (drastic change in running surface or footwear), gradual weakness (limited strength training, only using certain muscles and neglecting others), and/or poor recovery (poor sleep, poor diet, overtraining, etc.).

Some classic overuse running-related injuries include: plantar fasciitis, shin splints, patellofemoral pain syndrome, IT band syndrome, gluteal tendon pain, and Achilles tendon pain, just to name a few.

Fear not! Including strength training into your running routine will set you up for success and is a great thing to include to proactively avoid an overuse injury!

Some examples of strength training for runners include:

  1. Step ups (slow up and down)
  2. Single Leg squat to a chair
  3. Heel raises, single leg and double leg (slow on the way down)
  4. Tip toe walking with weight
  5. Side to side Band walks (band around ankles)
  6. Single leg bridges
  7. Side plank holds
  8. Lunges

Although this is not a complete list of options, and certain exercises may suit you better than others, it’s important to include exercises that target all running muscles (calves, feet, thighs, glutes, core). These exercises are not meant to be extremely heavy or difficult and require very little equipment. Running strength training should be done to compliment your running routine, not burn you out. Therefore, strength training should be completed 2-3x per week. (Disclaimer: These are just general suggestions and may not be best for you, your body, or your training schedule).

If you would like to learn more about how to structure a specific strength training program into your running routine pop in to see me at Synergy East! Happy Running!

Leah Forrestall

Leah Forrestall

Physio Therapist

You can book with author and Registered Physiotherapist, Leah Forrestall, through our website HERE or by calling the clinic at 416-551-8715.

Tennis Elbow Doesn’t Have to Cause a Racquet!

by Rebecca Watson

I hate to be the one to break it to you… but just because you don’t play tennis, doesn’t mean you can’t get tennis elbow! Tennis elbow (or lateral epicondylalgia) is the most common overuse injury that affects the small muscles of the forearm.

Although it is common in athletes who play racquet sports, it is also very often seen in individuals who perform repetitive tasks with their wrists and hands – such as typing, twisting, gripping, or lifting.

The muscles that control our movements at the wrist, hand, and fingers all attach at the elbow! Any repetitive movements can cause strain on these tendons over time, and lead to tiny amounts of tugging and tearing that eventually cause injury and pain in the elbow – even the smallest movements that used to be pain free can start to become quite difficult to perform.

Moving away from epicondylitis…

In the healthcare world, tennis elbow has historically been referred to as lateral epicondylitis, with “itis” suggesting that there is acute inflammation of the wrist extensor tendons.

However, with tennis elbow, we know that this is not necessarily always the case… there can be many other causes of elbow pain – and this can go on for quite some time without there being any inflammation!

Therefore, we use the term lateral epicondylalgia (“algia” meaning pain), to encompass any other causes of this condition. (inflammation, tissue degradation, tears, reduced blood supply)

So you have elbow pain… now what?

As we’ve now learned that the main cause of tennis elbow is repetitive overuse of the wrist extensor tendons, it only makes sense that to manage this condition, we must learn ways to modify activities to prevent any excessive strain on the muscles.

Talking to your physiotherapist can help you figure out the best ways to modify your regular activities to prevent any additional strain and help you safely get back into the things you love without causing worsening symptoms.

Some activity modifications may include:

  • Taking more frequent breaks
  • Changing your body position
  • Temporarily avoiding the activity

Optimal Loading

As much as we have to reduce strain on the tendons, we also have to find ways to strengthen them to prevent reinjury and optimize our activities! This may be a combination of stretches, mobility exercises, and eccentric loading of the muscles. Your physiotherapist can help you determine which exercises are best suited for you and your goals!

Some more options for managing symptoms include:

  • Massage
  • Mobilizations
  • Ice
  • Bracing
  • …and more!

Every individual injury is unique, so it is best to get advice from a physiotherapist who can conduct a thorough assessment and create a management plan that is targeted towards your goals.

Rebecca Watson

Rebecca Watson

Physio Therapist

If you’re struggling with managing the symptoms of tennis elbow, book an assessment today with our resident physiotherapist, Rebecca Watson, at Synergy East!

You can call us to book a consultation at (416) 551-8715, or simply book online.

A Map to Your Back Pain

by Brittany Kafka

It hurts to get out of bed in the morning, it hurts to get in and out of the car, it hurts to stand up, it hurts to sit down, it hurts to get dressed. Does any of that sound like you? If so, read on!

Back pain can really limit us from completing our daily activities and impact nearly everything we do in a day. As a result, it can be difficult to figure out what you should and should not do when your back hurts. However, the good news is that back pain is rarely dangerous and that our backs are strong, resilient, and often, craving movement.

If you follow the MAP [Movement, Activity Modification, Pain Management] to your back pain, it should help take you where you want to go!

Movement

Even though it’s sometimes counterintuitive, movement is often one of the best things we can do when our back hurts. Here are a few gentle movements to try for a sore back! With each of the movements below, you are always in control of how much you move. Try to always keep any exercise you do for your back within a comfortable range of motion when your back is aggravated!

1. Cat Camel

Start in a 4 point position (hands and knees). Arch your back and look up to the sky while inhaling. Then, exhale and round your back. Try 2 sets of 10 each day!

2. Child’s Pose to Cobra

Start in a child’s pose with your bum towards your heels. Then, come into a four-point position and bring your hips towards the ground, transitioning into a cobra, leading with your hips pushing toward the ground.
Try 2 sets of 10 each day!

3. Lumbar Rockers

Lie on your back with your knees bent. Gently let your legs rock from side to side. Try 2 sets of 10 each day!

Activity Modification

Here are four ways we can decrease the intensity of our tasks without eliminating them altogether. Try turning the dial down a notch instead of cutting things out altogether!

  1. Decrease range of motion. For example, try doing a mini squat or mini lunge instead of all the way to your end range.
  2. Decrease the number of reps. Take out a set or take out a few repetitions or decrease the frequency of your sessions/activity each week.
  3. Decrease speed or resistance. Work at a slower pace or decrease the weights that you’re using.
  4. Increase rest between activities. Take longer breaks between sets/reps or take more days off during the week.

Pain Management

It’s essential to have strategies in your tool kit that can help provide some relief and reduction of symptoms in certain positions. Here are three ways that can help!

  1. Resting Table Top. Lying on your back, elevate your feet to 90 degrees, ensuring your calves are supported. This helps reduce any load or weight through the spine and is usually a very comfortable position. Try taking a few breaths here!
  2. Side-Lying. If you lie on your side to sleep, place a pillow between your knees. This helps take some tension off the back and hips!
  3. Heat or Cold. Depending on your preference, try using a hot or cold pack for 15 minutes. Avoid putting it directly on your skin.

Heat or Cold. Depending on your preference, try using a hot or cold pack for 15 minutes. Avoid putting it directly on your skin.

The Head Retraction: Make It Better!

By: Keith Fernandes

Should I retract my head?

The head retraction is an essential part of neck therapy. It is a normal, physiological movement, that is prescribed around the world, by physicians, physiotherapists, osteopaths, chiropractors and more, due to its ability to help.

There are many variations of it. I tell my patients, do not do an exercise unless your therapist tells you WHY. And how often, and with what technique. And again, WHY! Same goes if a health professional advises you NOT to do an exercise, or sleep on your stomach, or look up and back with your neck…. There are no, across the board, unsafe movements or positions, but some CAN be harmful depending on your condition. Reasons should be given so that you the client can be empowered with the understanding, and be able to ultimately trouble shoot movements / exercises on your own, and more independently manage your symptoms. So do not perform repeated head retractions unless it has been prescribed to you, as a remedial exercise.

Let’s assume you have been prescribed this movement to do on a regular basis. I have noticed 2 common techniques taught. One, with the head in a neutral position, and another, with a flexion direction added in. They have different indications.

Neck Retraction

Forward Head Posture

Common Issues with correct performance of The Head Retraction

Adding flexion or extension to the movement. Some clients are unknowingly doing this!

Strategies Improve Your Head Retraction and Tips:

  • Set your gaze forward, if your gaze goes up or down, so will your chin.
  • Imagine wearing a baseball cap, the brim should not move down as you retract.
  • Imagine a drawer closing, it moves straight back, not up or down.
  • Imagine smelly cheese – and move your head back away from it.
  • Use your hand on the chin to guide you, I know, it can be a weird movement to learn – this can make it easier!
  • Breathe during, generally a good tip with most exercises.
  • Don’t try it in the car when driving, as the headrest will often stop the head movement back and then you end up flexing downwards.
  • Look in the mirror, ensure that you are indeed retracting the head and not just tipping back from your mid back.

Position, Force and Time Enhancements of The Head Retraction

  • Can be done in sitting, standing, supine over the edge of a table or bed or resting propped up on your forearms.
  • Can be done with self overpressure on the chin, mobilization from a therapist, and with a strap around the neck, to provide more effective segmental motion.
  • Can be held for 0.5 seconds to 3 minutes, depending on the issue and response to movement.
Keith Fernandes

Keith Fernandes

Physiotherapist - PT, BScPT, HBScKIN, Cred.MDT, CYT, MCPA

Keith is a Registered Physiotherapist, whose focus and passion is treating head and neck pathology. He has taught this movement to students, clients of all ages, from 5 years to 90 years of age, to physicians, neurologists, dentists, and to a room full of PT’s. It does take a few minutes of practice, but is worth the efforts. He provides patient care at the west end location (Wallace Avenue) of Synergy Sports Medicine and Rehabilitation Centre. To book with Keith by clicking HERE  or by calling 416-703-3525.