Jan 19, 2022 | Blog Posts
by Rachel Varga
 Plantar Fasciitis is an injury to the plantar fascia, which is a thick band of connective tissue at the bottom of the foot, running from the heel to the base of each toe. It functions to support the arches of the foot, especially in weight-bearing positions and during movement.
Plantar Fasciitis is the most common reason for foot pain. In fact, it affects 10% of the population at some time in their life, and it usually starts after a sudden period of increased weight-bearing such as prolonged standing, walking or running.
Some of the other predisposing factors to the development of Plantar Fasciitis can include:
- Increased arch height or flat feet
- Poor foot and ankle mobility
- Calf muscle weakness
- Tight hamstring muscles
- Improper footwear or training surface
Where you can expect to experience pain with Plantar Fasciitis is on the bottom of the heel. There are also a few hallmark signs associated with the injury. These include experiencing pain first thing in the morning after standing on your feet, increased pain after a prolonged period of sitting that improves with a little bit of movement, but then worsens again with too much movement, as well as pain walking barefoot.
There is strong evidence for physical therapy intervention in the management of Plantar Fasciitis. In particular, manual therapy and exercise focused on strength and movement training is supported.
Here are three of my favourite exercises for treating Plantar Fasciitis:
Ankle Dorsiflexion Mobilization
Position yourself in standing with your foot on top of an elevated surface.
Keeping your heel on the surface, perform a gentle lunge to bring your knee over your toes. Hold this position for 5 seconds and repeat 10-15 times.
1st Toe Extension Mobilization
Position yourself in standing and place a lacrosse ball underneath your big toe.
Keeping your heel on the ground, perform a gentle lunge over the lacrosse ball. Hold this position for 5 seconds and repeat 10-15 times.
Position yourself on an elevated surface with your heels hanging off. Go up onto the toes of both your feet (at a 1-2 second count).
Then lift your non-affected foot to slowly lower down on your affected foot only (at a 5-6 second count). Perform 3 sets of 10 repetitions.
Although Plantar Fasciitis can persist for a very long time, sometimes months-to-years, it has been shown that a large proportion of patients (80-90%) can recover in 6-12 months of conservative management. So, if you are someone who thinks they might be dealing with a new or old injury to the plantar fascia and would like to learn how to best manage the issue, book an appointment with our Registered Physiotherapist, Rachel Varga, at Synergy Sports Medicine East on the Danforth!
Physiotherapist - B.A. Hons (Kin), MSc.PT
Rachel Varga is a physiotherapist practicing at Synergy Sports Medicine, East End (2017 Danforth Avenue)
Dec 8, 2021 | Blog Posts
By: Leah Forrestall
The Pelvic floor is a network of muscles, ligaments, and fascia that act as a support system (like a hammock). It has many layers and is very innervated with nerves and blood vessels. Everyone has one and it only varies slightly between males and females!
What does the Pelvic Floor Do?
The Pelvic floor is in charge of a number of very important and essential tasks!
- Support: as the bottom of the core it is in charge of holding many organs in place against gravity and pressure
- Sexual: assists in orgasm (hallelujah!) and helps bring blood to the penis and vagina to maintain arousal and provide tone to the vaginal/rectal canal
- Sphincteric: controls opening of the urethra, vagina, and rectum to help maintain healthy urine and fecal function
- Stability: help to maintain stability in the hip, pelvic, and SI (sacroiliac) joints as well as offloading the low back
- Sump-Pump: Helps as a lymphatic and blood pump to decrease congestion in the pelvis
Where is my pelvic floor and how do I identify it?
Your pelvic floor is located at the base of your pelvis. If you think of your “core” as a cube, the pelvic floor is the bottom of the cube, the diaphragm (breathing muscle) is the top, and your abdominal, spinal and deep core muscles are the sides of the cube. It’s like a “hammock” at the bottom of your pelvis, and unfortunately, it gets forgotten about far too much!
What does Physio for your Pelvic Floor entail?
Depending on what brings you in to see a pelvic floor physio your experience may vary slightly.
Assessment:
Just as your typical physio appointment would go, your therapist will take a detailed subjective history of your presenting condition. This part typically takes up most of the first appointment.
We ask you about everything from when your presenting concerns started to what your bowel movements look like (check out the Bristol Stool Chart .. this always brings some light-hearted laughs to the appointment!) to how your sleep schedule typically is.
Once we’ve chatted in detail about your pelvic and general health we will discuss physical assessment options. This may include the recommendation of an internal pelvic floor exam. Yup, we said internal! We promise this is not as bad as it sounds. We use gloves and lubrication to insert 1-2 fingers vaginally (and sometimes rectally, in specific cases) and walk you through what we’re doing the whole time. We try to make you feel as calm and comfortable as possible! Of course, this is with your informed consent and you can choose to opt-out of this (but it does make our job as therapists easier to feel what’s happening within the pelvic floor and give you the best feedback). On the flip side, internal exams are not always indicated and we may only need to assess things such as your hip, glute, and back movements/strength.
Treatment:
Treatment will vary as well depending on your unique condition. This will include TONS of education! We teach you about your anatomy, your habits, your physical and mental health. We teach you things to do to improve your bladder and bowel habits and your sexual health! We educate you on your pelvic strength and/or tension and what you should do to strengthen or lengthen (Surprise! It’s not just teaching you to do kegels until the cows come home! Kegels may not be for you!). We can provide you with internal cues to contract or relax your pelvic floor better and use tools to give you feedback on your pelvic floor contractions.
Pelvic floor physio for each person varies but all treatments include teamwork between you and your therapist to achieve your unique goals. And we promise you’ll learn loads along the way!
How do I know if I need Pelvic Floor Physio?
Pelvic floor physio is for ANYONE with a pelvis!
There are various reasons you may need to see a Pelvic Floor Physiotherapist, such as: uncontrolled urinary leakage or urgency (incontinence), prolapse management (pressure), pre and post-partum management, constipation, nerve irritation or damage, and pain (with or without intercourse, urination and/or orgasm) in your pelvis, low back, or hips. You can also see pelvic floor physio for post-surgical management from a c-section, hernia repair, and prostate removal. Pelvic Floor Physio is also great as a prevention strategy prenatally to incorporate evidence-based strategies and education to help you during and after your pregnancy, as well as during labour.
How do I see a Pelvic Floor Physio at Synergy?
You can book with our Certified Pelvic Health Physiotherapists through our website or by calling our clinic!
Physiotherapist - BSc Hons (Kin), MSc PT
Author, Leah Forrestall is a Pelvic Floor Physiotherapist practicing out of our Danforth location. You can book with her by clicking HERE or by calling 416-551-8715.
Nov 13, 2021 | Blog Posts
By: Samuel Yiu
A common question that I often get asked by clients is if they should go for medical imaging to confirm their injury. Oftentimes, the answer to this question depends on a few clinical variables. The two most important questions I consider are;
- Will the image results significantly change the physiotherapy treatment plan or outcome?
- Does this condition require more than Physiotherapy treatment, and if so, will imaging be needed to initiate the process?
Medical imaging such as X- Rays, Ultrasounds, and MRIs are helpful tools for diagnosing injuries and determining how long an injury might take to heal. It can also inform which treatment options may be best for the patient (ie. surgery vs. conservative rehabilitation). The purpose of this blog post is to provide a brief summary of the different types of imaging that are commonly used to evaluate musculoskeletal/sport injuries and to discuss which situations may warrant consideration for medical imaging from a physiotherapy perspective.
X-rays
X-rays use electromagnetic waves and radiation to create images inside of your body. The images are formed through various shades of black and white. The density of a tissue affects how much radiation is absorbed, which in turn determines how dark/bright the structure will turn out on the image. The denser a structure is (ie. bones), the whiter the structure will be. Other structures such as muscles, ligaments, and nerves are not seen on X-rays as the density of these tissues are not sufficient to emit enough lighting from the radiation.
X-rays are best at telling us about the health of our bones and are often the first source of imaging used to determine if there are fractures and dislocations. X-rays can also evaluate how bones interact and align with each other at their joints and can show underlying conditions such as arthritis.
Ultrasound
Ultrasound imaging uses sound waves to produce an image inside of your body. The technician will place a transducer on the skin, which sends high-frequency sound waves in and out of the body. The sound waves are then converted into an image by a computer. Ultrasound does not use any radiation and can show motion of the structures in real-time.
When it comes to musculoskeletal injuries, ultrasounds work well for investigating structures such as tendons, muscles, and ligaments, that all lay outside of the joint. . Common injuries that ultrasound imaging can pick up include muscle tears, inflammation around tendons, and ligament sprains.
MRI
MRI, also known as Magnetic Resonance Imaging, uses a magnetic field along with radio waves to produce a comprehensive image. It is often considered the most robust form of medical imaging, as it produces a total view of joints (inside and outside), muscles, ligaments, cartilage, and bones. MRIs are commonly used for injuries/conditions that are located deep into a joint or impact a large area of the body, such as ACL tears, meniscus injuries, spinal disc herniations, and hip labral tears.
MRIs are often in high demand and with limited machines and technicians across the country, there are often long wait times to receive an image. As of September 2021, the average wait time for an MRI in Ontario is 68 days, although these wait times can vary based on which city you reside in and the urgency for imaging to be completed. *
Ultrasound vs. MRI
Ultrasounds present with limitations and there are scenarios where MRIs are required to investigate structures that ultrasounds cannot pick up. Generally, an MRI is required for investigating deeper structures inside a joint such as cartilage, bones, or deeper ligaments. Ultrasounds work well for smaller surface areas and structures that are closer to the surface of the body such as muscles and tendons. If a patient needs a more detailed view of an entire joint, MRIs are the better choice. However, more often than not, physicians may send you for an ultrasound first as wait times are usually shorter.
Closing Thought
While the use of medical imaging may be helpful in informing a diagnosis, it should rarely be used alone to explain the cause of your pain. Medical imaging only shows the structural integrity of body tissues. Pain is complex and it is not always the case that structural damage equates to dysfunction or vice versa. For example, an individual could present with degenerative discs in their low back and not experience any low back pain, or another individual could present with chronic knee/shoulder pain without any structural damage to the joint, ligament, or muscles. In addition, the findings from medical imaging are not always completely accurate, as the results are dependent on a radiologist’s or surgeon’s interpretation. In some cases, the range of agreement when interpreting imaging results can be shockingly inconsistent.
In Ontario, physiotherapists are unable to refer their clients directly for imaging. This means that an individual must see a physician first to get their requisition for the imaging procedure. However, physiotherapists can still play a critical role in helping determine whether or not you need imaging. If your physiotherapist suspects that you need medical imaging, they may educate you on what to say to your doctor and recommend a specific imaging procedure for you to ask for. Your physiotherapist may also choose to provide your doctor with a letter to further explain why their clinical findings warrant further investigation through imaging.
Physiotherapist - MScPT, MScOT, BHK
Samuel Yiu is a registered Physiotherapist at Synergy Danforth. If you would like to schedule a consultation with him, you can do so by clicking HERE or you can email him at samuel@synergysportsmedicine.com
Nov 9, 2021 | Blog Posts
By: Brittany Kafka
Your foot caught on the curb you didn’t see, you lost your footing hiking, or you just rolled over your ankle while walking, now what? You’re probably suspecting that you’ve sprained your ankle, and your plan is to stay off it for a couple of days, ice it, and once you’re pain-free you should be good to go, right?
Unfortunately, just because we can name an ankle sprain or know what the injury is, doesn’t mean that the standard Rest, Ice, Compress, Elevate (RICE) is the best way to manage it. We want to treat the ankle initially with Protection, Optimal Loading, Ice, Compression, Elevation (POLICE). However, even once the initial pain has subsided, it is important to continue with a strength and balance training program to prevent ankle sprains from recurring in the future.
 How do I know if I sprained my ankle?
Symptoms of a sprained ankle often follow a bad landing or rolling of the foot and can include:
- Decreased range of motion
- Pain at the outside, inside, or front of the ankle
- Swelling
- Discolouration
- Difficulty with weight-bearing
- Tenderness to touch
What happens when I sprain my ankle?
Most often, when we sprain our ankle, it is a result of an inversion sprain- meaning the ankle rolls inward. This movement causes injury to the ligaments on the outside of our ankle that help with the stability of the foot. These ligaments are called the Anterior Talofibular Ligament, Calcaneofibular Ligament, and Posterior Talofibular Ligament. Depending on the severity of the ankle sprain, one or more of these structures may be damaged. As a result of the pain and injury to the ligaments, range of motion is often reduced, ankle strength is limited, balance is impaired, and functional tasks may become challenging.
Where to start?
If you think you have sprained your ankle, it is best to come in and get a physiotherapy assessment to confirm your diagnosis and develop an individualized treatment plan to manage pain and restore function. In the meantime, start by following the POLICE guidelines.
Protect: Rest the ankle from high-intensity activities to prevent further damage. Use crutches for the first few days if unable to weight-bear without limping.
Optimal Loading: Maintain gentle mobility of the ankle by pumping (flexing the foot up & down) and drawing circles with the ankle. Walk short distances as tolerated if able to weight bear without limping.
Ice: Ice the ankle for 15 minutes on,15 minutes off a couple of times a day for the first few days following the injury. Be sure to avoid directly putting the ice against your skin.
Compression: Use a tensor bandage or soft brace to create compression at the ankle and decrease swelling.
Elevation: While icing the foot, keep it elevated above the pelvis to help decrease swelling.
What next?
If you’ve had an ankle sprain, book an appointment with our Registered Physiotherapist, Brittany Kafka, at Synergy East, today! She facilitates a safe, engaging, and welcoming environment to make physiotherapy fun and get you back on your feet!
You can call us to book a consultation at (416) 551-8715, or simply book online.
Sep 13, 2021 | Blog Posts
By: Dylan Tannyan
Groin strains are a dreaded but unfortunately common injury that occur during activity or sport. When discussing the groin muscles, we are really referring to the hip adductor group of muscles. The muscles that adduct the hip (bring your thighs towards each other) include: adductor brevis, adductor longus, adductor magnus, gracilis, pectineus, and obturator externus. To keep things simple, we are going to refer to this collective group of muscles as “the adductors.” The adductor muscles all attach relatively close to the middle of the pelvis and run down to various points along the inner thigh (the exception being gracilis which attaches below the knee).
 Although not always realized (sometimes until we hurt them), our adductor muscles are involved in almost every compound lower body movement. Sometimes acting as stabilizers, other times acting as movers, especially during squatting, lunging, and side-to-side cutting. You can never fully prevent a groin strain from occurring, but you can help reduce the chance by strengthening the adductor muscles. We are going to look at strengthening the adductors as a whole group. You can focus on strengthening a specific muscle if that is your goal or to rehab a specific injury. Strengthening a muscle involves creating a forceful muscle contraction to put load across the muscle and tendinous tissues. If it is a tolerable stress/load (i.e. not causing an injury) on the muscle and tendinous tissues, it will help the body adapt to better handle these types of load in the future. The goal with any strengthening for injury reduction is to progressively increase the load to be greater than whatever that person requires for their activity.
I am going to review two options to start loading up the adductor muscles groups. These are both isometric exercises which means the muscles will be engaged, but not stretching or shortening through movement.
Adductor Ball Squeeze

All you need for this exercise is a ball or some object that is soft enough to comfortably squeeze with your knees, but it should be firm enough that it will give you resistance and not just collapse. Lay on your back with both knees bent and your feet on the ground. Place the ball between your knees and squeeze the ball together with both legs. This is an easy-to-adjust exercise, because you can determine how hard you squeeze the ball. If your muscles get too tired or become too sore, squeeze with less intensity. If you barely feel your muscles working, you can attempt to squeeze the ball harder between your legs. Hold each repetition for a full 5 seconds and then relax. Aim to complete this exercise for 5 repetitions of 5-second holds, for 3-5 sets.
Adductor Plank

Despite also being an isometric exercise, the adductor plank is drastically more challenging than the ball squeeze because you are holding up your body weight during this exercise (making it harder to scale down). Set up beside a chair or couch laying on your side and rest one knee on top of the surface. Use your adductors to lift your body up as you plank on one arm. Hold for 10-15 seconds and relax back down. Aim to complete this exercise for 3 repetitions of 10-15 second holds, for 3 sets.
More specific frequency prescription (how often to complete the whole exercise during the week) is dependent on the patient or goal. However, incorporating one of these exercises into your weekly routine is a good starting point.
Physiotherapist - BA Kin (Hons.), MScPT
Dylan is a Toronto based registered physiotherapist who enjoys working with a wide range of patients whose goals range from chronic pain improvement to sport and high performance. He also specializes in vestibular and concussion rehabilitation. He utilizes a mix of specific exercise prescription, manual therapy, dry needling, and education with two main objectives: outcome and efficiency. Dylan wants all of his patients to reach their functional goals as well as have the confidence, education, and physical tools to manage their injury over the long term. Dylan currently works out of Synergy Sports Medicine and Rehabilitation in East York. If you are looking for a physiotherapist you can book with him HERE or contact him directly at dylan@synergysportsmedicine.com
Sep 13, 2021 | Blog Posts
By: Dylan Tannyan
The rotator cuff is vital to the function of a happy shoulder. It is a collection of 4 muscles: subscapularis, teres minor, supraspinatus, and infraspinatus. These muscles originate on the scapula (shoulder blade) and attach to the humerus (upper arm bone). While these muscles help externally and internally rotate the arm (hence the “rotator” cuff), the most important role of these muscles is to stabilize the already mobile glenohumeral (shoulder) joint. The rotator cuff acts to compress and stabilize the two bones of the joint together. However, this becomes more challenging for the muscles if the arm is stretched out in front of, beside, or above the body.
In general, when your elbow is further from your body there will be more leverage and therefore load exerted on the shoulder. Before progressing to harder exercises that create more stress on the rotator cuff, we are going to start with exercises that keep the elbow closer to the body. Because the rotator cuff muscles assist with joint stability and both internal and external rotation of the shoulder, we are going to begin with two exercises that use these movements.
Shoulder External Rotation with a Band
Set up a resistance band at stomach height. Hold the band in one hand in front of your stomach with the band running in front of your body. There should be tension on the band in this position and throughout the movement. Do not pull your shoulder blades back, just keep them in a stable position throughout the movement. Your arm should be bent to 90 degrees with your elbow resting comfortably close to your side (do not pinch your elbow into your body).
The goal of the movement is to just rotate through your shoulder. You should not be raising your elbow in any direction, you should not be bending/extending your elbow, or moving the wrist. Move your hand from in front of your stomach to out beside your body by rotating at your shoulder. Slowly return to the starting position and repeat. Complete this on both sides. Aim for at least 3 sets up to fatigue (quality over quantity) or until hitting 10-12 repetitions.
Shoulder Internal Rotation with a Band
Set up a resistance band at stomach height. Hold the band in one hand with your hand out to the side of your body. The band should be outside your body, not in front of you. Make sure there is tension on the band in this position and throughout the movement. Do not pull your shoulder blades back, just keep them in a stable position throughout the movement. Your arm should be bent to 90 degrees with your elbow resting comfortably close to your side (do not pinch your elbow into your body).
The goal of the movement is to just rotate through your shoulder. You should not be raising your elbow in any direction, you should not be bending/extending your elbow, or moving the wrist. Move your hand from out to the side of your body to in front of your stomach by rotating at your shoulder. Slowly return to the starting position and repeat. Complete this on both sides. Aim for at least 3 sets up to fatigue (quality over quantity) or until hitting 10-12 repetitions.
More specific frequency prescription (how often to complete the whole exercise during the week) is dependent on the patient or goal. However, incorporating one of these exercises into your weekly routine is a good starting point.
Physiotherapist - BA Kin (Hons.), MScPT
Dylan is a Toronto based registered physiotherapist who enjoys working with a wide range of patients whose goals range from chronic pain improvement to sport and high performance. He also specializes in vestibular and concussion rehabilitation. He utilizes a mix of specific exercise prescription, manual therapy, dry needling, and education with two main objectives: outcome and efficiency. Dylan wants all of his patients to reach their functional goals as well as have the confidence, education, and physical tools to manage their injury over the long term. Dylan currently works out of Synergy Sports Medicine and Rehabilitation in East York. If you are looking for a physiotherapist you can book with him HERE or contact him directly at dylan@synergysportsmedicine.com
Jul 21, 2021 | Blog Posts
by Samuel Yiu, MScPT
Registered Physiotherapist
Synergy Danforth
If you have experienced knee pain while squatting or lunging in the past, you may have read fitness advice to never let your knees go over your toes. While there are specific conditions that may warrant this suggestion, this overarching claim to never let your knees go over your toes simply is not true for many. Suggestions that ostracize one specific movement such as “you should never squat with your knees over your toes” has made many people fearful of squatting or lunging at all. Secondarily, those that are preoccupied with avoiding these movements during exercise are likely to develop further injuries over time as it could result in improper movements and compensations at your low back, hips, and ankles.
The purpose of this blog post is to highlight the benefits of squatting/lunging with knees over toes, and also when may be an appropriate time to take a break from loading into this movement.
Let’s start off by discussing the anatomy and biomechanics involved when squatting/lunging with our knee over toes. For simplicity, I will only focus on anatomical structures located in the front of the knee; the patella (our kneecap) and the quadriceps (muscles in the front of our thigh). The primary function of our quadricep muscles is to extend (straighten) the knee from a bent position. The patella is a sesame-shaped bone which sits under our quadriceps/patellar tendon and functions as a pulley to help the quadriceps generate greater torque (angular force).
The amount of force that our quadriceps can generate often depends on the positioning of our tibia (lower leg) in relation to our femur (thigh bone). Let’s try a quick experiment. I want you to try standing up from a chair with your feet planted on the floor and your knees behind your feet. (See picture 1) Try it now.
Chances are, you bent your hip forward and tried using the momentum of your hips to swing you up to standing. You may find that this movement is quite unnatural. Now, let’s try standing up with your feet positioned right under the front of the chair and knees over the toes. (See picture 2) This time, you likely did not need to bend your hips as far forward and this movement felt more natural. This simple demonstration hopefully helps illustrate just how often we need to position our knees over the toes on a day-to-day basis. Other examples of everyday activities that require us to utilize this movement include walking and going downstairs.
From the example above, we can see that moving our knees past our toes will utilize more of our quadriceps muscles both when extending our knee (coming up from a seated position) and controlling the bend of our knee (lowering into a seated position). By practicing squatting/lunging with your knees over toes, you are allowing the quadriceps muscle to work through its full range of motion and training up more of the muscle’s potential.
One thing to keep in mind is that with more force being produced from the quadricep muscles, there is increased pressure at the knee joint. Structures such as the kneecap are compressed by the increased pull of the quadriceps muscles and there is also an increased load on the patellar tendon (tissue that attaches your muscle to bone) the further the knees bend past the toes. (This concept is likely where the belief that “you should not squat with your knees over toes” originated from.) However, this increased stress is not harmful to your knee if performed with proper execution.
So, why am I advocating that people squat and lunge with their knees over toes? Why should you put increased “stress” at your knee joint? Well, like any movement/exercise, the only way you can get better is to practice. If you avoid loading your knees over your toes, your knees over time may develop less tolerance towards the stress of deep knee bending. This could limit you in participating in activities such as sports, gardening, and playing with your children/grandchildren in a pain-free manner. When we squat/lunge with our knees over toes, over time, we can progressively build greater tolerance to more pressure placed on our knees, reducing soreness when you do activities that place pressure on the knees.
If you are a person who experiences sensitivity/pain from squatting or lunging with your knees past your toes, it could be a sign that your knee is not ready to withstand the forces of that movement at this point in time. However, it does not mean that you will never be able to perform this movement or that doing this movement will further injure your knee. With a proper assessment of your strengths and weaknesses and an individualized strength/mobility training regimen, you will be able to build confidence with movements involving knees over toes gradually!
Registered Physiotherapist
Samuel Yiu is a registered Physiotherapist at Synergy Danforth with special interest in knee pain. If you would like to schedule a consultation with him, you can do so by clicking HERE or you can email him at samuel@synergysportsmedicine.com
Jul 13, 2021 | Blog Posts
by Rachel Varga
Let’s face it. As a society, we are moving less than ever before. We are working from home, dealing with gym and sports facility closures, and just navigating through many other personal and environmental factors that can limit time, energy and motivation. As a result, we are seeing more complaints of pain, stiffness and injury related to inactivity than ever before.
When treating these patients, a key feature that should never be left out is movement. As a Physiotherapist, I also believe it is important for patients to understand what movement actually does to our bodies and why it is so beneficial in a multifactorial rehabilitation approach.
The Science Behind Movement
Did you know there is a science of movement and how it can physically change how our tissues feel?An extremely fascinating concept and probably my all-time favourite technical term to break down for patients is the word thixotrophy.
Thixotropy is the idea that a substance will get stiff when immobile, but fluid when shaken or stirred.
Knowing that our body tissues respond to how we use them, if we took this scientific idea and applied it to our muscles, joints and ligaments, we might be able to expect something like this:
Increased body movement → Increased tissue mobility → Decreased pain, stiffness and injury.
Benefits of Movement
 Aside from decreased pain, stiffness and injury, regular movement has many additional health benefits. Without realizing it and if left unaddressed, some may further contribute to the complaint you are seeing your physical therapist for. These include:
- Maintain muscle strength
- Train balance control
- Improve mood
- Improve quality of sleep
- Increase energy levels
- Improve cardiovascular and respiratory health
Movement Strategies
A home exercise program should be developed for any specific area of complaint. However, there are general movement strategies that can be adopted to break up inactivity throughout the day. I would recommend everyone take a few minutes to change up their posture after every 30-45 minutes of being stationary by using some of these simple ideas:
- Take a walk around the room during virtual meetings or calls
- Keep your cell phone or water bottle across the room so you have to get up to use it
- Complete a quick household chore (take out the garbage, fold a few pieces of laundry, put away some dishes)
- If actively working with a physiotherapist, use the opportunity to get a set of rehabilitative exercises in!
Our Registered Physiotherapist, Rachel Varga, strongly embodies movement in her practice and is a strong believer in empowering her patients to become active participants in their recovery. If you are someone who is experiencing pain or injury and is unsure how to get started on an exercise plan, contact Synergy Sports Medicine on the Danforth to book an appointment with Rachel!
You can contact Rachel with any questions at rachel@synergysportsmedicine.com
Physiotherapist - B.A. Hons (Kin), MSc.PT
Rachel Varga is a physiotherapist practicing at Synergy Sports Medicine, East End (2017 Danforth Avenue)
If you’re having issues with your hip, be sure to book with Rachel to get you back on track.
Jun 15, 2021 | Blog Posts
by Brittany Kafka
Every movement, every skill, every sound, sight, and taste are new to babies. In the first couple of years, it is truly incredible all the things that infants learn to do, from rolling to sitting to walking! Given the vast amount of development that occurs, it’s really no wonder some children might have trouble learning some of these motor skills.
Physiotherapy can help a baby overcome difficulties in motor skill development, such as rolling or crawling, by providing appropriate exercises to increase strength, adapting play positions and strategies to facilitate development. Not only that, but your pediatric physiotherapist will be sure to provide you with education on child development so you know exactly what to expect along the way
Why do babies need physiotherapy?
Babies can need physiotherapy for a variety of reasons. The top three reasons babies need physiotherapy are torticollis, congenital disorders, and delays in gross motor milestones.
Torticollis
Torticollis occurs when one of the baby’s neck muscles becomes shortened and tight. This can occur from positioning or birth complications and can be noticed by the baby having a head tilt, a preference to look one way, and/or preferring to feed on one side. Addressing torticollis is important because it can lead to motor delays later in development.
Congenital Disorders
Congenital disorders, such as down syndrome or cerebral palsy, can delay motor development and create challenges in playtime. These conditions predispose infants to differences in timelines and ability for development, which a physiotherapist can help you better understand.
Motor Milestone Delays
Delays in gross motor milestones such as rolling, crawling, sitting, or walking are very common and often result from a lack of strength. Every baby will develop on their own timeline; however, plateaus with the development of new skills is an indicator your baby may benefit from physiotherapy.
Physiotherapy can help address any muscle tightness, strengthen the appropriate muscles, and provide adaptations and exercises to the play environment that help facilitate appropriate development in all of these conditions.
Signs that your baby might need physio:
- A plateau in their motor development
- Delays in motor milestones
- Difficulty with tummy time
- Flattening of the back or side of the head
- Head tilt to one side and/or preference in looking one way
- Low tone (feeling floppy)
- Congenital diagnoses such as cerebral palsy or down syndrome
- Birth injuries such as clubfoot or a brachial plexus injury
- Preference to use one side for motor skills
How does a physio session with my infant look?
In an initial assessment with you and your infant, you will be asked questions to help build a complete and comprehensive picture of you and your infant. You will be asked about the birth and pregnancy, any complications, the infant’s current skills and timelines they were achieved in, their sleeping, feeding, and communication skills, tummy time, your goals, and more.
Your infant will be observed in all age-appropriate positions (lying on their back, tummy, side, and sitting/standing if appropriate). The therapist will engage in play with your infant to see how they move and play as well as any limitations that may exist. Based on their findings, the therapist will create a treatment plan for you and your infant including frequency and timing of visits, and skills to be worked on. The therapist will provide you with education for at-home modifications and how to structure play therapeutically, as well as any specific exercises or stretches required.
Throughout treatment, your infant’s progress will be assessed through observation and information from you. We will modify and progress skills and play as appropriate to build strength and continue to facilitate development. Treatment will include age-appropriate therapeutic play and hands-on strategies as required.
What can physio do for babies?
Physiotherapy can help your infant build the strength, practice, and support they require to help them continue to develop their motor skills. Physiotherapy can also provide you with education on development and how best to support this at home.
Motor skills are vital in navigating our world, and it is important we support these skills and growth early!
Apr 28, 2021 | Blog Posts
by Rachel Varga
Did you know that many common lower-body injuries can occur because of hip muscle weakness? This is ultimately because our hip muscles play a significant role in how we load the joints of our lower body, including our knees and ankles, and control our movement patterns. A very important muscle that deserves special attention is the gluteus medius muscle.
The gluteus medius muscle runs from a part of the pelvis called the ilium, to a bony prominence called the greater trochanter located on our big thigh bone, otherwise known as the femur.
The primary functions of this muscle are to abduct the hip (move our leg out to the side) and stabilize the pelvis. However, if we break it down into its individual fibre groups, the anterior portion also plays a role in flexion and internal rotation of the hip, while the posterior portion is involved in extension and external rotation.
So, with all of the responsibility this muscle holds, we can see how it would be an important one, right?
Weakness in this muscle can contribute to a wide variety of injuries all the way down the lower body including, but not limited to:
- Ankle sprains
- Knee ligamentous injuries
- Hip bursitis
- Pelvic instability
- Low back pain
Three exercises that have shown to be effective in isolating the activation of this muscle, and could be used for any of the injuries listed above (depending on patient-level) are explained below.

Position yourself lying on your side with your hips in line with your shoulders, and your top leg straight.
Keeping the top leg in full knee extension and neutral rotation, lift it towards the ceiling into hip abduction.
Single-Leg Squat

Balance yourself mostly on one leg, keeping the knees and hips slightly flexed.
Then, bending through your hip, knee, and ankle joints, slowly lower yourself to the ground.
Aim to touch your opposite hand to your stabilizing foot without reaching with your shoulder.
Lateral Band Walk

Wrap a band just above the ankles. Standing with your feet slightly apart and your hips and knees in a bent position, push your knees outward into the band.
Then, while maintaining tension against the band, take a step out to the side with one leg. Bring your feet back together and repeat the process.
Physiotherapist - B.A. Hons (Kin), MSc.PT
Rachel Varga is a physiotherapist practicing at Synergy Sports Medicine, East End (2017 Danforth Avenue)
If you’re having issues with your hip, be sure to book with Rachel to get you back on track.
Apr 11, 2021 | Blog Posts
By: Riki Richter
Most of us are familiar with the terms anterior and posterior tilt of the pelvis and can easily feel the pelvis tip/flex forward on the thighs during exercises such as a deadlift or squat. The two pelvic halves and sacrum tip/flex forward as a unit to create flexion/folding at the hips.

The picture below (from Kapandji Physiology of the Joints) is showing the front hip bones coming together, the sitting bones widening and the top of the sacrum tipping forward as the tail lifts back. These are also movements available at the pelvis that if you are a yoga or Pilates practitioner you may already be familiar with these movements.

Let’s talk about Cat/Cow which can be taught in many different ways. It can be taught as a spinal flexion and extension exercise where you arch and curl your spine. In the version of Cat/Cow pictured below, the movement is initiated from the sitting bones and the protractor has been placed over markers on the sitting bones.
Below are pictures of a Wide-Legged Forward Bend (Prasarita Padottanasana for yoga practitioners). For most people, this is the easiest place to feel the sitting bones widen as you flex/fold forward at the hips. You can place your fingers on your own sitting bones and monitor their movement.
Can you feel your sitting bones widen as you fold forward?
Can you feel your sitting bones narrow as you come up? As an experiment try this: do not allow your sitting bones to widen and then flex/fold forward at the hips. Can you do this without rounding your lumbar spine?
Try this simple exercise from the Synergy 4 Week Back Care Program where we use a yoga block to find a neutral spine by widening/narrowing the sitting bones. If you do not have a yoga block use a rectangular object or a small pile of books about the same size.
More on why these actions are important in a future blog post.
In the meantime can you find these actions?

D.O.M.P., Synergy Movement Therapy Director
During an osteopathic appointment, I focus on assessing and treating the interrelationships between various body systems and removing any existing barriers to health. Although I treat many different conditions, I focus on pregnancy and postpartum, lower back and pelvic dysfunction. I have been teaching movement for 25 years and it has become a vital part of my assessment and treatment. I teach patient-specific movement re-education whether it be lifting a grandchild or performing a high-level sport. I aim to empower patients to take control of and be involved in their own healing process. Dr. Awan and I began collaborating in 2004 and since opening Synergy we have focused on an outcomes-based rehabilitation model we call “Movement Based Rehabilitation”. I programmed exercises based on common deficits found by Dr. Awan and created Synergy Movement Therapy Protocols used in 1-on-1 and group classes including BackCare, Hip & Knee, Neck & Shoulder, Foot & Ankle, Stenosis and Pelvic Health.
Apr 10, 2021 | Blog Posts
With virtually everything virtual these days, we thought we’d take the opportunity to use the online space to help give back and support the community.
We are very excited to be hosting the Synergy Gives Back Raffle, an online raffle to help support the charity Camp Quality. In addition to supporting a charitable cause, we wanted to recognize our local businesses and generous donors for sponsoring our event and making it possible.
Help us help the community by contributing, sharing, or participating in the ways you are able. Read more below or get your tickets HERE!
 Who is Camp Quality?
All proceeds of the raffle will be donated to Camp Quality, a local organization and registered charity that runs free overnight camps and year-round programming across Canada for kids with cancer and blood disorders. You can find out more about Camp Quality HERE.
 How Do I Participate?
The raffle is open to all Ontario residents (19+) from April 10 – May 2 2021. Tickets are 1 for $10, 3 for $25, and 10 for $80. Tickets can only be purchased ONLINE HERE. Purchasing a ticket makes you eligible in the draw for ALL prizes. Winners will be drawn on May 3 2021 and notified via email.
Check It Out!
You could win some EPIC PRIZES including:
- $250 Metro Gift Card
- 4 Express Anytime Ripley’s Aquarium Passes
- Wine/Beer Tour & Tastings for 10
- Niagara Parks Passes for 2
- a 14 K Gold Diamond Kimberfire Necklace and MUCH, MUCH, MORE!
Take a Look!
Here is the breakdown of all the prizes you could win HERE.
Please help us help the community by supporting this wonderful cause, and please check out the local businesses and generous donors that have sponsored us.
Questions? Please let us know!
Contact britt@synergysportmedicine.com.
Don’t miss out! Get your tickets at synergysportsmedicine.com/raffle!
A Big Thank You to Our Sponsers
Jan 13, 2021 | Blog Posts
By: Dylan Tannyan
We are going to talk about the gluteus maximus (glute max) muscle. This important muscle sits on both sides of the body and runs from the pelvis to the femur (leg bone).
The main role of this muscle is to extend and externally rotate the hip joint. The glute max is vital for simple tasks such as standing, walking, and even trunk support while sitting. This muscle becomes even more important during tasks of high force and power generation such as running or almost any sport activity.
Many folks are concerned that they aren’t using their glute max effectively, that their glute max isn’t firing properly, or that it’s “turned off.” Unless someone has sustained a serious neurological injury, they will be able to “fire” or contract their glute max muscle. It is therefore impossible to have a “turned off” glute muscle outside of serious injury.
The more likely reason someone can’t “fire” or feel the muscle is because the muscle is not strong enough or set up in a position where someone is able to efficiently contract the muscle. When the glute max is placed in a position where it can’t efficiently contract, or if the muscle is not strong enough for the task, other muscles such as the hamstrings or the erector spinae (low back muscles) may kick in to help the movement. This is why so many people get cramps in their hamstrings when trying to activate their glutes.
 We are going to review a very simple and common exercise, the glute bridge. Along with a progression for it, the following will focus on proper set up to ensure you are contracting that glute max effectively.
Begin by lying on your back and bending your knees to bring your heels as close as you comfortably can to your pelvis. The closer you can get your feet to your pelvis, the easier it will be for your glute max to contract and the harder it will make it for your hamstrings to help. Your feet and knees should be approximately hip-width apart and should stay this far apart throughout the movement (don’t drive your knees together at any point through the movement) .

Squeeze your glute max as you press down through the heels of your feet as you bridge up into the air. Attempt to raise up so that the line from your knee to hip to shoulder is straight. Be careful not to hyperextend your lower back to force the bridge up higher, all the movement should occur at your hip joint. Slowly lower all the way back to the ground, relax, and repeat.

For a progression, you can complete a single leg glute bridge by simply crossing one leg over the other and going through the same steps for the exercise. There will be more required strength and control with this exercise as your hips should still raise up level (don’t let your pelvis drop off to one side).

Make sure with both exercises you are not excessively bracing your core or holding your breath. The repetitions and sets for these exercises can vary greatly depending on your goals/strength. Aim for at least 3 sets up to fatigue (quality over quantity) or until hitting 10-12 repetitions.
This is general information that is not meant to replace the assessment and specific advice of a registered physiotherapist.
Physiotherapist - BA Kin (Hons.), MScPT
Dylan is a Toronto based registered physiotherapist who enjoys working with a wide range of patients whose goals range from chronic pain improvement to sport and high performance. He also specializes in vestibular and concussion rehabilitation. He utilizes a mix of specific exercise prescription, manual therapy, dry needling, and education with two main objectives: outcome and efficiency. Dylan wants all of his patients to reach their functional goals as well as have the confidence, education, and physical tools to manage their injury over the long term. Dylan currently works out of Synergy Sports Medicine and Rehabilitation in East York. If you are looking for a physiotherapist you can book with him HERE or contact him directly at dylan@synergysportsmedicine.com
Jan 13, 2021 | Blog Posts
By: Dylan Tannyan
 Shin splints are a common issue that can be effectively managed with the help of a Physiotherapist. It presents as pain along the bone in the lower leg, usually made worse by walking, running, jumping, or any type of impact activity. But what exactly are shin splints and what are some ways to avoid them?
The term shin splints is often used to encompass any pain in the shin. However, true “shin splints” normally involve one or both of the following muscles (and their tendons/connective tissue): tibialis anterior and tibialis posterior.
Both muscles run along the length of the tibia, with the tibialis anterior muscle running along the antero-lateral (front/outside) portion of the bone and the tibialis posterior muscle on the medial (inside) portion of the bone. This is why some people will have pain along the inside of their shin, some people will have pain along the front/outside of their shin, and some people get pain along both areas.
To keep things simple, both of these muscles are important for absorbing impact/load and resisting pronation (where the arch of the foot and the ankle splay inwards to disperse force). Pronation often gets a bad reputation but this motion is absolutely necessary for ideal function when walking, running, or basically anything we do on our feet.
replace the assessment and specific advice of a registered physiotherapist.
Pronation is not a bad thing, however it is important to control the motion with our muscles and when this doesn’t go well, that’s when problems can occur.
If the tibialis anterior and tibialis posterior aren’t as strong as they need to be for the activity, or if someone increases their activity more than the muscles can accommodate, then shin splints can rear their ugly head.
There are other factors that will affect the loading of the foot and lower limb, which a physiotherapist can assess and address. But here, we are going to go over two simple exercises that are safe for most people to start on their own that will help strengthen the tibialis anterior and tibialis posterior muscle.
Secure a band to a stable object and while seated wrap the other end of the band to the top of your foot. Before starting, make sure you move far enough back to add tension to the band. Bring your toes/foot up toward your shin against the resistance of the band and slowly lower back to the starting position. Complete 10 repetitions x 3 sets, daily.
While seated, cross one foot over the opposite thigh and wrap the band around both feet. It is important to keep the foot and toes pointed throughout this exercise to activate the appropriate muscle. Raise your foot up in a “scooping” motion against the resistance of the band while keeping the toes pointed. Slowly lower back to the starting position. Complete 10 repetitions x 3 sets, daily.
These exercises can be done more often than prescribed above, especially if you find them helpful for reducing pain.
This is general information that is not meant to replace the assessment and specific advice of a registered physiotherapist.
Physiotherapist - BA Kin (Hons.), MScPT
Dylan is a Toronto based registered physiotherapist who enjoys working with a wide range of patients whose goals range from chronic pain improvement to sport and high performance. He also specializes in vestibular and concussion rehabilitation. He utilizes a mix of specific exercise prescription, manual therapy, dry needling, and education with two main objectives: outcome and efficiency. Dylan wants all of his patients to reach their functional goals as well as have the confidence, education, and physical tools to manage their injury over the long term. Dylan currently works out of Synergy Sports Medicine and Rehabilitation in East York. If you are looking for a physiotherapist you can book with him HERE or contact him directly at dylan@synergysportsmedicine.com
Jan 11, 2021 | Blog Posts
By: Brittany Kafka
Gymnasts constantly perform great feats of power, strength, and flexibility; moving in ways found to be astonishing and gravity-defying. However, due to the high demands of the sport and intensive forces on the body, gymnasts are at a high risk for injury.
In addition to the physical challenges of the sport, the culture frequently breeds an attitude of pushing through pain. This pressure from coaches, parents, and the athletes themselves leads to an exacerbation of injuries, longer healing times, decreased performance, and more time away from the sport.
Therefore, when a gymnast starts to get that niggling of pain, it is beneficial to see a physiotherapist. We can provide meaningful activity modifications, manual therapy, and specifically tailored exercise programs to help meet a gymnast’s goals. Addressing pain and injuries early can help to prevent exacerbation and recurrence of injuries, recognize flexibility or strength deficits to improve performance, and increase the longevity of the athlete’s career.
Therefore, here are my top 3 reasons why if you’re a gymnast, you should be seeing a physiotherapist:
- Preventing Injury/Reinjury
When a gymnast is in pain with certain skills or activities, it is important to address these limitations to avoid compensations with the potential to lead to further aggravation. Physiotherapists have the ability to address and treat the cause of the pain to minimize the likelihood of the same injury recurring in the future. - Improving Performance
As a result of pain or injury, a gymnast may be limited in their ability to perform a skill. However, by assessing a gymnast’s functionality, a physiotherapist is able to identify and develop a plan to overcome any strength, flexibility, or other limitations that may be concomitantly contributing to pain and preventing the gymnast from excelling.Deficits in strength or the presence of pain can prevent a gymnast from achieving more challenging skills, which have higher forces and demands on the body. However, building an individualized rehabilitation plan through physiotherapy can help a gymnast progress the difficulty of their tumbling passes (i.e. from a back tuck to back layout) by improving strength, power, and gradually progressing training surfaces and repetitions.
- Increasing Longevity
Leaving pain unaddressed ultimately leads to greater time off from sport, and can shorten a gymnast’s career. A physiotherapist will build a comprehensive and gradual return to sport plan, ensuring adequate strength and conditioning progressions that address the high level demands of the sport. These step-by-step comprehensive plans help to build the opportunity for a longer gymnastics career by building foundations that prevent injury or reinjury and make performance more efficient.
Why Physiotherapy?
Physiotherapists play a fundamental role in preventing injury and reinjury, improving performance in gymnastics, and maintaining a gymnast’s longevity in the sport by identifying and addressing the root cause of pain and injuries. By treating the cause and not just the symptomology, physiotherapists are able to make a meaningful difference in meeting gymnast’s goals. Building strength, power, and flexibility with physiotherapy will help you vault stronger, tumble higher, swing bigger, and balance better.
Being assessed by a physiotherapist who specializes in working with gymnasts can help by ensuring your sport-specific needs are understood and addressed. This assessment involves obtaining a detailed health history and gymnastics profile, observing and evaluating strength, range of motion, functional movement, and relevant sport-specific skills. Finally, we will collaborate to form an appropriate individualized treatment plan and graded return to gymnastics plan.
Jan 11, 2021 | Blog Posts
By: Samy Shash
Confession time: all too often, when I encounter a new patient with a musculoskeletal injury, seemingly out of nowhere, I’ve felt inclined to look at specific details of their movement, strength of their muscles, mobility of their joints, or any specific mechanical factor to help better understand their pain. Over the years, I’ve come to realize more and more that a multitude of lifestyle factors can make a huge difference in terms of recovery as well as injury risk.
Sleep quality tends to be one of the most overlooked lifestyle factors affecting recovery – especially in athletes or those who live active lifestyles! There are no one-size-fits-all solutions, but here are a few interesting facts about sleep that may change the way you think about recovery from pain or injury, as well as athletic performance.
Sleeping for more than 7 hours a night lowers your risk of injury
- Research shows that athletes who reported injuries, cardiorespiratory issues, and psychological stressors slept less than 7 hours a night
- Teenage athletes who sleep less than 8 hours a night have been shown in the research to have a 1.7x higher risk of injury than those who slept more than 8 hours a night
Sleep quality even affects bone density
- Research shows that women who slept less than 5 hours a night on average had lower bone mineral density compared to those who slept more than 7 hours a night
Sleep can improve overall performance
- It can be reasonable to assume that playing sloppy, or being off your A-game can impair form, limit focus and potentially place you at risk for injury. Sleeping for over 8 hours a night has been shown in research to improve sports performance as well – demonstrating improvements in basketball players’ speed and shooting accuracy
 Does it sound like any of these sleep issues apply to you? Stay tuned for Part 2, which will discuss my top 5 tips to help you improve your sleep hygiene and maximize your recovery!
Physiotherapist
Samy is a registered physiotherapist at Synergy, working at both the east and west end locations. He treats a wide variety of conditions including athletic injuries, aches and pains from working at home, and weekend warriors. He holds a Master of Science in Physiotherapy from McMaster University and a Bachelor of Science in Kinesiology from York University. If you have any specific questions for Samy he can be reached at samy@synergysportsmedicine.com, and to book online click HERE for the east end, or HERE for the west end.
Jan 11, 2021 | Blog Posts
by Samy Shash
 For runners, jumping athletes, and anyone who enjoys bootcamp-style training, Achilles pain can be a huge burden on your performance. It often takes months to resolve, and the pain can bounce back unexpectedly. A quick consultation with Dr. Google will often result in a prescription of hundreds and hundreds of heel raises. While heel raises are definitely the staple of any rehab program, there are a few overlooked areas which can make a big impact on your recovery.
1. Lack of hip extension
 In other words, this means an inability to fully “kick back” your leg, whether it’s due to stiffness in the hip joint itself, or tightness in the muscles at the front of your hip (the hip flexors). Extending your hip back is what propels your body forward when walking or running. A loss of this forward propulsion force from your hip, means that those forces must come from somewhere else. Unfortunately, this can often place undue stress on the Achilles tendon.
2. Lack of ankle dorsiflexion
 This refers to the ability of your foot to bend up towards your shin. For a quick easy way to self-assess this, try the test below. Can you fit close to a hand span between your big toe and the wall? If not, this may be a risk factor for achilles tendinopathy.
3. Too much ankle pronation
 This often occurs as a secondary consequence to scenario #2. Stiffness in ankle dorsiflexion means that the extra movement at the ankle must come from elsewhere. Often this is at the joint below, called the subtalar joint. Running with the ankle moving in and out of pronation can cause excessive pulling or “wringing out” at the tendon level. It also forces your calf muscles to work harder to help keep your heel stable when running.
Achilles pain can take months to resolve, but addressing some of these overlooked mechanical factors can make the recovery process more manageable and less painful. If you feel stuck with your sporting progress due to your achilles pain, be sure to have these addressed by a physiotherapist to make sure you can get back on track!
Jan 11, 2021 | Blog Posts
by Samy Shash
Lately I’ve been reading a lot about breathing. Maybe you, like myself, have come across a multitude of articles telling us we don’t know how to “breathe properly”. While I appreciate the intention behind those articles, today’s blog post isn’t going to be a step-by-step walkthrough on learning how to activate your diaphragm, breathe through specific nostrils or anything complicated like that. Today’s post is about a deeper question: why is it that focusing on our breathing helps us manage stress?
2020 has been anxiety-inducing for more reasons than I can fit into this post, so understanding how we can use breathing to our advantage can benefit just about anybody. Research shows that when we are in a state of stress, it is difficult to regain control over our emotions, thoughts and actions due to changes in how the prefrontal cortex in our brain is engaged. Long-term, this can literally change how our brain and nervous system function. And since the brain has so much to do with how we process the experience of pain, gaining control over our stress can be a powerful complement to any physical therapy intervention.

When we are stressed, our breathing tends to become shallower and more rapid, activating the sympathetic nervous system – which is responsible for our innate fight-or-flight mechanism. When we slow our breathing, we active the parasympathetic system – which is responsible for our innate “rest and digest” mechanism.
How can we use a structured technique to take control of our breathing when stressed? One such technique is called box breathing. This strategy originates from an ancient Yoga practice known as Sama Vritti Pranayama, which means “equanimity”, “whirlpool” and “breath control” in Sanskrit. It was also recently popularized by former U.S. Navy SEAL Mark Divine, who used it to keep his special ops team calm under pressure. Try the steps below right now and add this to your stress management toolbox. All you must do is close your eyes and envision the box drawn below:
Physiotherapist
Samy is a registered physiotherapist at Synergy, working at both the east and west end locations. He treats a wide variety of conditions including athletic injuries, aches and pains from working at home, and weekend warriors. He holds a Master of Science in Physiotherapy from McMaster University and a Bachelor of Science in Kinesiology from York University. If you have any specific questions for Samy he can be reached at samy@synergysportsmedicine.com, and to book online click HERE for the east end, or HERE for the west end.
Aug 3, 2020 | Blog Posts
by Rachel Varga
INTRODUCTION
Running is an extremely popular sport, whether it is done competitively or recreationally, and as an individual or group activity. One of the biggest barriers to a runner is pain, which can occur in many ways. A very popular place pain will show up in a runner is the knee. This can create issues for someone attempting to start, maintain, or progress their running program.
Are you a runner with knee pain?
Keep reading to learn more about possible mechanisms behind it, as well as some of the things a physiotherapist specializing in running injuries would consider in order to overcome it!
KNEE PAIN CONDITIONS
There are many reasons why someone might develop knee pain when running, and often it is simply classified as ‘Runner’s Knee,’ but what does that really mean? Well, as the name suggests, ‘Runner’s Knee’ is just a phrase used to describe knee pain – in runners! To be clear, this is not a true diagnosis, and there could be many other conditions that explain the pain from running.
It’s our job as fellow runners and physiotherapists, like myself, to find out exactly what is going on, and most importantly, why!
Some of the most common conditions that can affect the knee in runners include:
Patellofemoral Pain Syndrome (PFPS) is what is probably most commonly referred to as that “Runner’s Knee,” as previously discussed. This is because it is also an umbrella term used to describe pain that can be located on top, slightly above, or slightly below the kneecap, and is undoubtedly brought on by running.
Given that it is such a broad definition, there are many factors that might lead to its occurrence. This may include muscle weakness, tight muscles, joint irritation, patella maltracking, or co-existing problems in the hips or ankles.
With so much to consider for a diagnosis such as PFPS, it is important to take a holistic approach to its assessment and treatment to prevent future complications.
The Patellar Tendon is located just below the kneecap (patella). It attaches from the bottom of the patella to the top of the shin bone and its major function is to transmit the force of the quadriceps over the knee joint.
When there is increased load on the knee extensors, such as during running, or any other activity that requires an explosive contraction of these muscles, it can overload the patellar tendon. This in turn can result in damage to the tendon fibres, with associated knee pain and inflammation.
In the beginning, tendon injury may be minor. However, if load is continuously applied to the patellar tendon that exceeds its healing capacity, chronic pain and dysfunction can result.
The Iliotibial Band (IT Band) is a thick band of connective tissue that comes from the Tensor Fascia Latae (TFL) and Gluteus Maximus muscles. It originates from the anterior iliac crest of the pelvis and attaches on the lateral aspect of the knee at the lateral epicondyle. As it travels along the outside of the thigh it crosses both the hip and knee joints.
IT Band Syndrome is a repetitive overuse injury of the knee that commonly occurs with running or even excessive walking. During these activities, as the knee flexes and extends, the IT Band moves backwards and forwards repeatedly over a bony structure called the lateral femoral epicondyle of the knee joint. If there is excessive friction of the IT Band over this area, it can lead to inflammation. The most common symptom is pain localized to the lateral aspect of the knee.
If left ignored, IT Band Syndrome can lead to progressive knee pain or recurrent inflammation.
Although these are some of the most common diagnoses, there are also many other possible explanations for knee pain when running. Other potential conditions include:
- Ligament or meniscus injury
- Osteoarthritis
- Bursitis
- Patella subluxation
While running may be the most significant trigger behind any type of knee pain, other aggravating positions or movements that might be experienced should also be considered. This could involve:
- Pain going up or down stairs
- Pain with squatting
- Pain when kneeling
- Pain when sitting or standing for prolonged periods of time
- Pain with transitional movements
In addition to the knee pain itself, other symptoms that might be noticeable are swelling, stiffness, clicking, grinding, and pain in different parts of the lower extremity, such as the low back, hips, ankles or feet.
There are often several contributing factors behind any knee pain diagnosis from running. These can include, but are not limited to:
- Previous knee trauma
- Overuse from other sport or activity
- Increased running mileage
- Increased running speed
- Running surface
- Footwear
- Muscle imbalances
- Joint abnormalities
In many situations, pain in the knee may not even be originating from the knee itself. Referred pain to the knee when running can come from the low back, hips or ankles.
CONCLUSION
There are many reasons why someone chooses to take up running. It could be to increase cardiovascular fitness, build strength, maintain a healthy weight or improve mental health. Therefore, whether you are a year-round or seasonal runner, or completely new to the activity, experiencing knee pain can be extremely hindering and discouraging to achieving whatever those goals might be.
A physiotherapist who specializes in running can help by conducting a thorough assessment to ensure a proper diagnosis is obtained. This would involve taking a detailed health and running history, examining the area of interest, and performing a series of specific tests. Then, an individualized treatment plan and return to running protocol would be developed to help achieve your goals.
If you are experiencing knee pain while running and could benefit from a physiotherapy assessment, book an appointment with Registered Physiotherapist and resident running specialist, Rachel Varga, at Synergy East, today!
You can call us to book a consultation at (416) 551-8715, or simply book online.
Physiotherapist - B.A. Hons (Kin), MSc.PT
Rachel Varga is a physiotherapist practicing at Synergy Sports Medicine, East End (2017 Danforth Avenue)
May 14, 2020 | Synergy Movement Series
WITH RIKI RICHTER, D.O.M.P.
Synergy Movement Therapy Director
Wednesdays 11-11:45 am
May 20, 27, June 3, 10
$20. per class + HST
This four week series will progress from:
- Whole Body Release
- Lower Body, Hips and Lumbar Spine
- Upper Body, Shoulders and Neck
- Whole Body Movement
Props required: 1 tennis ball, 1 red & 1 blue theraband, 1 hand towel, 1 exercise mat, 1 pillow.
These classes are suitable for anyone who wants to move more efficiently and is not in acute pain. Progressing from releasing tension and creating ease of movement, to regional and global strengthening. Empowers self awareness through embodied biomechanics easily applicable to activities of daily life or sport or activity.
You can do all four classes as a progression or sign up for just the classes that you would like to take.
Book Virtual Movement Series Now
Whole Body Release
This class will cover self massage / self release techniques from the feet to the head. Something for everyone – whether you are a runner or suffer from headaches. The goal of this class is to reduce tension and create ease of movement.
Lower Body, Hips and Lumbar Spine
Strengthen from the feet, up through the knees, hips and lumbar spine, this class will target key areas and concepts such as knee tracking, and hip abductor and hip extensor strengthening. Efficient hip and lower chain movement is key to healthy lumbar spine movement. The goal of this class is strengthening and modifications from simple to challenging will be given.
Upper Body, Shoulders and Neck
This class will cover thoracic spine mobility, scapular stabilization and rotator cuff strengthening, and their importance in shoulder and neck health. The goal of this class is strengthening and modifications from simple to challenging will be given.
Whole Body Movement
This class will incorporate aspects from the Lower Body, Hips and Lumbar Spine Class and the Upper Body, Shoulders and Neck Class to strengthen global movement patterns. The goal of this class is strengthening and modifications from simple to challenging will be given.
Book Virtual Movement Series Now
May 12, 2020 | Synergy Movement Series
with ANDREA PELOSO
Sunday January 5, 2020
1pm-3pm
$60. + HST
235 Wallace Avenue
Andrea Peloso is an internationally recognized yoga teacher with a specialty in Restorative Yoga. She has assisted Judith Hanson Lasater for 18 years and taught trainings in Restorative Yoga for close to a decade. She teaches for Yoga International.
This two hour workshop will introduce students to the practice and benefits of Restorative Yoga. Students will leave able to commence a home practice with the deepest benefits to health.
Space is limited so contact Synergy at
416-703-3525 to reserve your spot now !
May 12, 2020 | Workshops and Trainings
With Riki Richter
D.O.M.P. D.Sc.O.
This is a recurring 4 week movement series.
Riki Richter is an Osteopathic Manual Practitioner and Movement Therapy Director at Synergy Sports Medicine. She wrote her thesis on Postpartum Low Back Pain.
For more information visit www.rikirichter.com/thesis
This course is suitable for pregnant and postpartum patients experiencing low back pain, sacroiliac pain, pubic area pain or simply wanting to strengthen.
Includes 6 easy to follow home exercise videos.
Space is limited so contact Synergy at 416-703-3525 to reserve your spot now !
May 12, 2020 | Workshops and Trainings
WITH RIKI RICHTER
This is a recurring 4 week movement series.
Do you have spinal stenosis, facet joint syndrome, spondylolisthesis or does your lower back just feel better working in flexion? This four week movement therapy series will give you the tools to self manage. This series is suitable for anyone that can get up stairs and lay down on a mat on the floor.
In this workshop you will:
- Learn to strengthen safely in lumbar flexion
- Learn what will aggravate and alleviate your discomfort
- Release tension in your lower back and pelvis
- Receive 8 easy to follow home exercises specific for your condition
Space is limited so contact Synergy at 416-703-3525 to reserve your spot now

May 12, 2020 | Workshops and Trainings
DR. SHAWNA PERLIN & LOLLI URSOMARZO
This is a recurring 2 hour workshop
Do you feel tension and stress?
The aim of this workshop is to help fix that.
Learn several simple and effective self-massage techniques and stretches to relieve muscle tension. This first hour will be led by Lolli, Synergy Movement Therapist.
In the second hour, Dr Perlin, MD & Certified Mindfulness Based Cognitive Therapy Facilitator, will guide you through three meditations, designed to hone your mindfulness skills. Learning to pay attention to the present moment, with compassion and without judgement, helps to decrease stress and anxiety, while increasing resilience and the body’s healing.
Leave feeling better, and equipped to do it again at home!
Space is limited so contact Synergy at 416-703-3525 to reserve your spot now !
May 4, 2020 | Workshops and Trainings
Professor Paul Hodges, DSc MedDr, BPhty(Hons), FACP
December 6, 2019 from 6-9pm
Synergy Wallace
By Invite Only
Light refreshments
Paul Hodges is a Professor and NHMRC Senior Principal Research Fellow in the Division of Physiotherapy at the University of Queensland and Director of the NHMRC Centre of Clinical Research Excellence in Spinal Pain, Injury and Health. Paul has doctorates in both physiotherapy and neuroscience and his work blends neurophysiological and biomechanical methods to understand the control of movement and stability and how this changes when people have pain. In 2006 and 2011 Paul was awarded the ISSLS Prize from the International Society for the Study of the Lumbar Spine. This is the premier international prize for back pain research. In 2010 he received the Achiever Award from the National Health and Medical Research Council as the highest ranked Research Fellow.
His primary research interests include investigation the relationship between pain and motor control; the coordination of the multiple functions of the trunk muscles; the effect of exercise in interventions on musculoskeletal pain; and the biomechanical mechanisms for control of the spine. In addition to his research in Brisbane, Paul has ongoing collaborations with laboratories in Sydney, Melbourne, Sweden, USA, the Netherlands, Denmark and South Africa. He has published more that 330 peer reviewed papers and book chapters.
Call Synergy at 416-703-3525 to book your spot !
May 12, 2020 | Workshops and Trainings
FRÉDÉRIC DUMUNIER, Manual Osteopath, DO (France)
This is a recurring training
This course presents an innovative approach to the peripheral nervous system and its care. The first part gives background concepts based on the most up-to-date scientific research. Human anatomy will be reviewed from micro (histology) to macro (interacting systems), including its origin (embryology), for a better understanding of the peripheral nervous system and how it is affecting the patients’ condition.
The second part demonstrates practical aspects of the program for an easy integration into day-to-day practice. It will give the movement teacher or therapist new tools to maintain and improve their exercise choices and treatments. Patient flexibility will be evaluated and patient specific interactive exercises discussed and demonstrated.
This course provides additional solutions to the movement teacher or therapist dealing with patients – from simple workday stiffness to more complex conditions involving the peripheral nervous system. Whether you are treating high ranking athletes, seniors or injured patients with acute to chronic conditions, the new skillset learned in this course will be an invaluable addition to your practice. This course is a must for yoga and ELDOA teachers.
Space is limited so contact Synergy at 416-703-3525 to reserve your spot now !
May 4, 2020 | Synergy Movement Series
FRÉDÉRIC DUMUNIER, Manual Osteopath, DO (France)
June 2, 2019
2:00 – 4:00pm
235 Wallace Avenue
Cost: $50 + HST
This course presents an innovative approach to the peripheral nervous system and its care. The first part gives background concepts based on the most up-to-date scientific research. Human anatomy will be reviewed from micro (histology) to macro (interacting systems), including its origin (embryology), for a better understanding of the peripheral nervous system and how it is affecting the patients’ condition.
The second part demonstrates practical aspects of the program for an easy integration into day-to-day practice. It will give the movement teacher or therapist new tools to maintain and improve their exercise choices and treatments. Patient flexibility will be evaluated and patient specific interactive exercises discussed and demonstrated.
This course provides additional solutions to the movement teacher or therapist dealing with patients – from simple workday stiffness to more complex conditions involving the peripheral nervous system. Whether you are treating high ranking athletes, seniors or injured patients with acute to chronic conditions, the new skillset learned in this course will be an invaluable addition to your practice.
Space is limited so contact Synergy at 416-703-3525 to reserve your spot now !
May 4, 2020 | Synergy Movement Series
WITH STEPHANIE TENCER FROM STUDIO PO
June 18, 2017
2:00 – 4:00 pm
235 Wallace Avenue
Cost: $45 + HST
2 week unlimited
pass at Studio Po included with attendance
Iyengar Yoga is often referred to as ‘meditation in action’. By focusing on the nuance of each pose, Iyengar Yoga physically aligns the body while simultaneously fostering the inner alignment of body and mind. Get a taste for the specificity of this style of teaching and experience how an emphasis on precise alignment can offer stability, mobility, and strength. All levels welcome. Space is limited so contact Synergy at 416-703-3525 to reserve your spot now !

May 4, 2020 | Synergy Movement Series
WITH KEARSTEN LYON
May 6, 2018
2:00 – 4:00 pm
235 Wallace Ave
Cost: $60 + HST
The Oov is an innovative movement device created by Daniel Vladeta DO, to train the body globally in 3D via balance training. It is an unstable device designed to create both stability and mobility and to effectively and efficiently enhance motor learning and improve performance. The Oov is also proving to be a useful tool for nervous system regulation and trauma resolution.
In this workshop you will:
- Learn what the Oov is and what it does
- Experience a group class on the Oov
- Explore how the Oov is used for rehab
Let us know your Oov size when you contact Synergy at 416-703-3525 to reserve your spot and size now!
Small up to 5’6” / 121 lbs.
Medium 5’6” to 5’11” / 121-165 lbs.
Large over 5’11” / over 165 lbs.
May 4, 2020 | Synergy Movement Series
WITH DARA JAUKOVIC
February 24, 2018
2:00 – 4:00pm
235 Wallace Avenue
Cost: $50 + HST
Learn how to awaken your own bio-intelligence by exploring the therapeutic and creative effects of Continuum Movement.
In this workshop you will experience a calmer, more centered and organized self and learn how to use:
- Sensory awareness
- Intention
- Slowing down towards more meditative states
- Breath and sound to enliven tissue
- Permission for creative expression
- Trust in the support of the field
- Your own resources and agency
This movement workshop is suitable for everyone and will support, inform and deepen any movement practice.
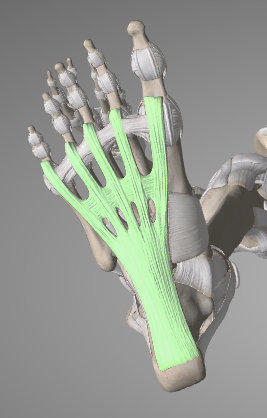 Plantar Fasciitis is an injury to the plantar fascia, which is a thick band of connective tissue at the bottom of the foot, running from the heel to the base of each toe. It functions to support the arches of the foot, especially in weight-bearing positions and during movement.


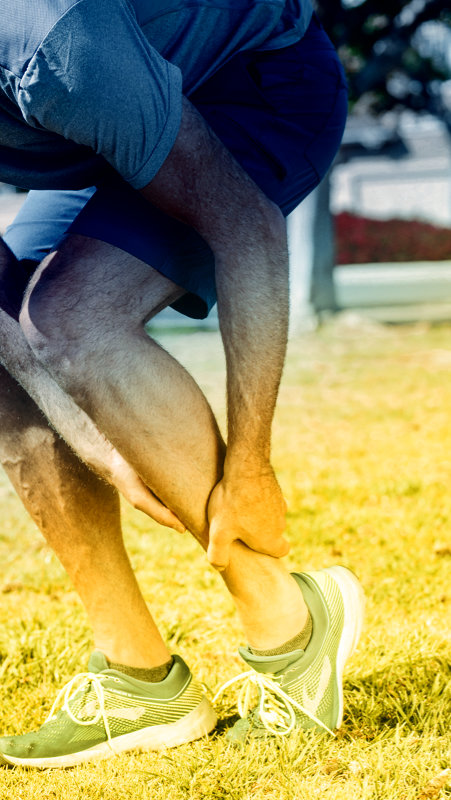 How do I know if I sprained my ankle?
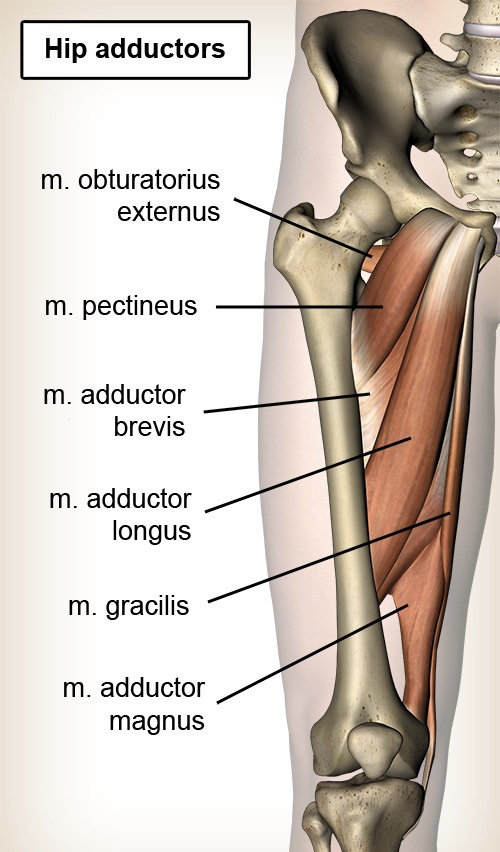 Although not always realized (sometimes until we hurt them), our adductor muscles are involved in almost every compound lower body movement. Sometimes acting as stabilizers, other times acting as movers, especially during squatting, lunging, and side-to-side cutting. You can never fully prevent a groin strain from occurring, but you can help reduce the chance by strengthening the adductor muscles. We are going to look at strengthening the adductors as a whole group. You can focus on strengthening a specific muscle if that is your goal or to rehab a specific injury. Strengthening a muscle involves creating a forceful muscle contraction to put load across the muscle and tendinous tissues. If it is a tolerable stress/load (i.e. not causing an injury) on the muscle and tendinous tissues, it will help the body adapt to better handle these types of load in the future. The goal with any strengthening for injury reduction is to progressively increase the load to be greater than whatever that person requires for their activity.
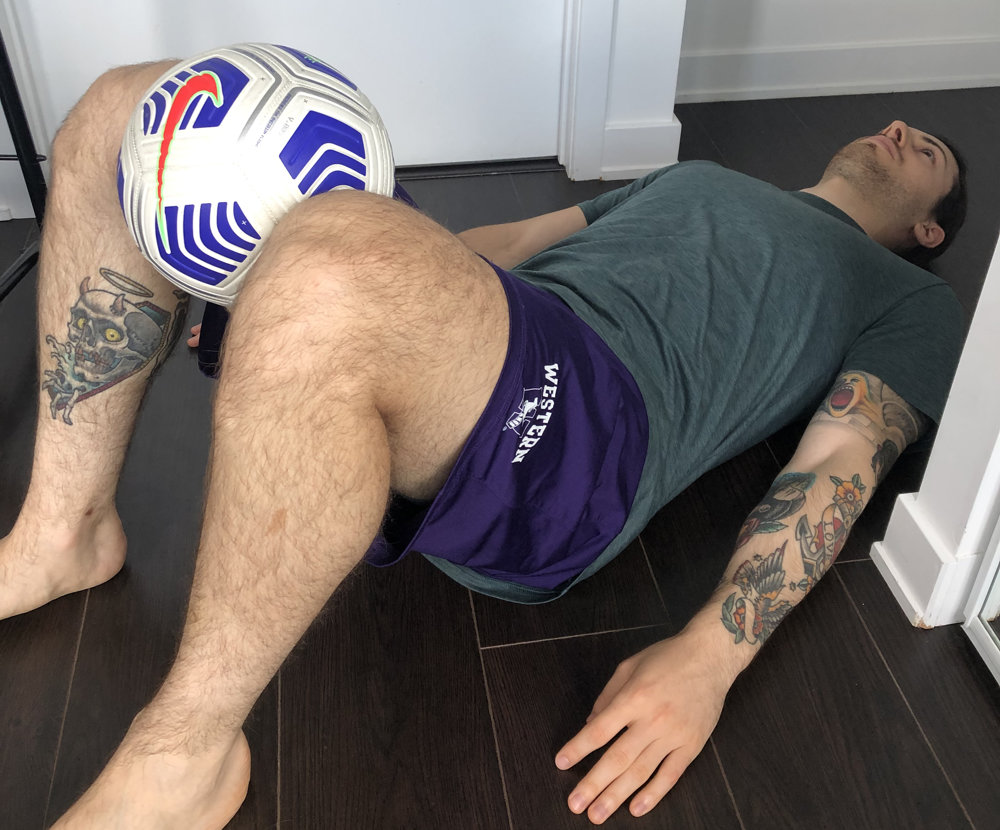


 Aside from decreased pain, stiffness and injury, regular movement has many additional health benefits. Without realizing it and if left unaddressed, some may further contribute to the complaint you are seeing your physical therapist for. These include:


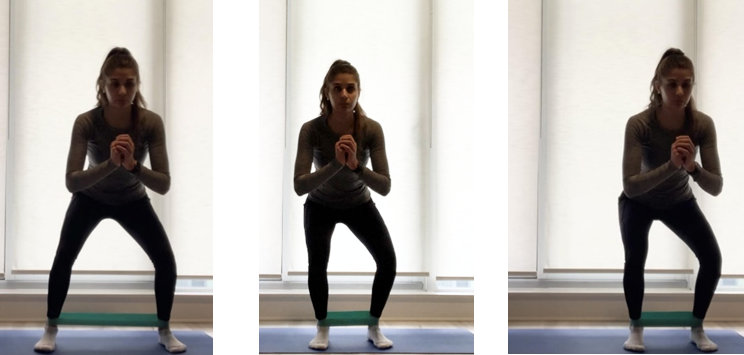

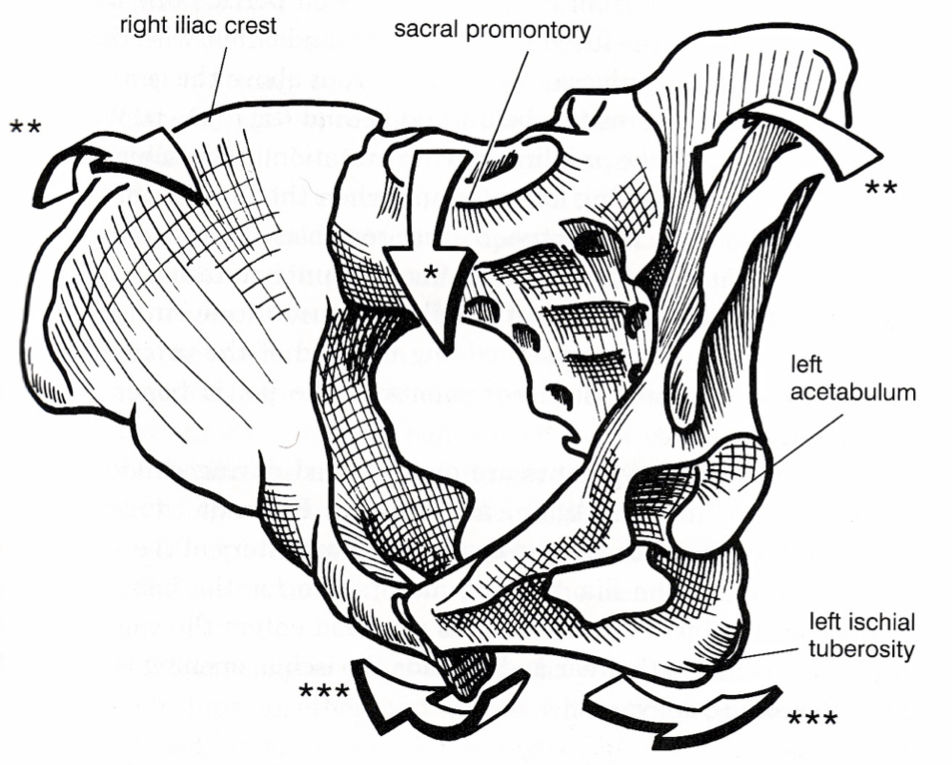


 Who is Camp Quality?
 How Do I Participate?
 Check It Out!
 Take a Look!
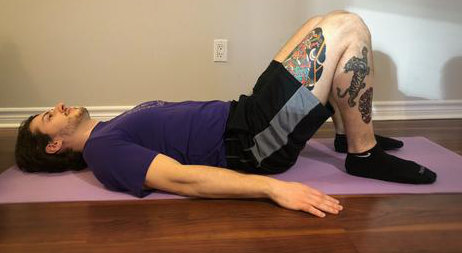 We are going to review a very simple and common exercise, the glute bridge. Along with a progression for it, the following will focus on proper set up to ensure you are contracting that glute max effectively.
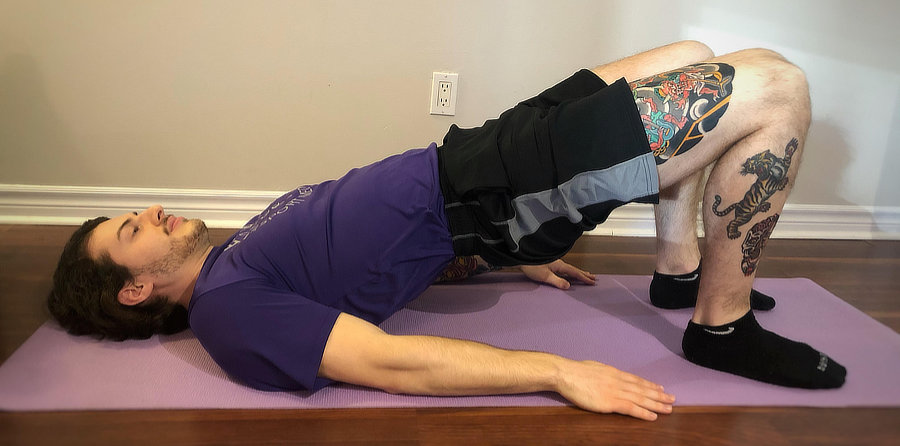
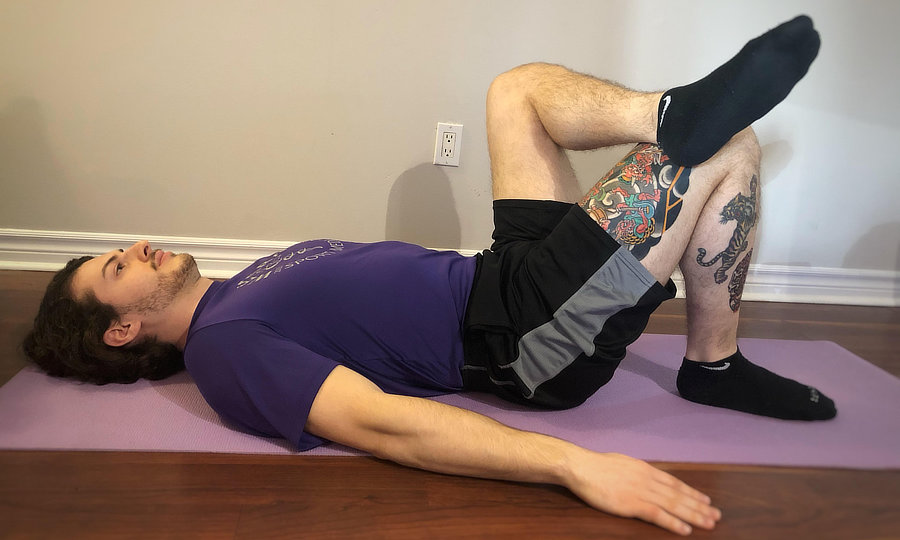
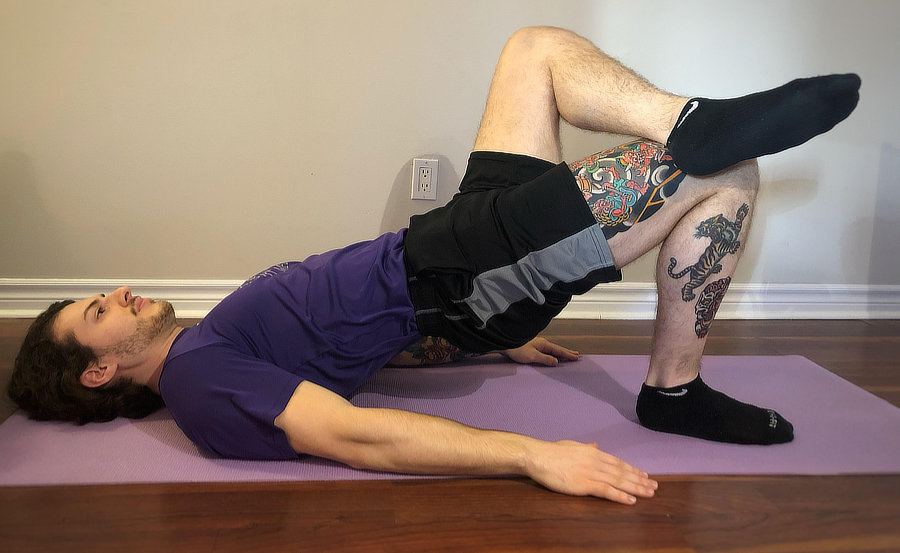
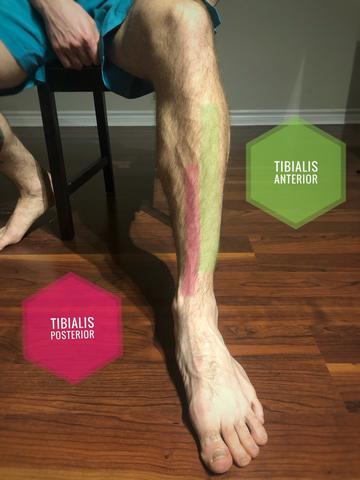 Shin splints are a common issue that can be effectively managed with the help of a Physiotherapist. It presents as pain along the bone in the lower leg, usually made worse by walking, running, jumping, or any type of impact activity. But what exactly are shin splints and what are some ways to avoid them?
 Pronation is not a bad thing, however it is important to control the motion with our muscles and when this doesn’t go well, that’s when problems can occur.
 While seated, cross one foot over the opposite thigh and wrap the band around both feet. It is important to keep the foot and toes pointed throughout this exercise to activate the appropriate muscle. Raise your foot up in a “scooping” motion against the resistance of the band while keeping the toes pointed. Slowly lower back to the starting position. Complete 10 repetitions x 3 sets, daily.
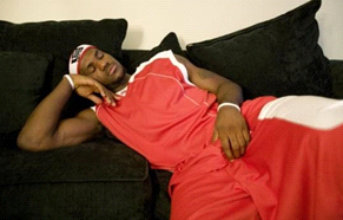 Does it sound like any of these sleep issues apply to you? Stay tuned for Part 2, which will discuss my top 5 tips to help you improve your sleep hygiene and maximize your recovery!
 For runners, jumping athletes, and anyone who enjoys bootcamp-style training, Achilles pain can be a huge burden on your performance. It often takes months to resolve, and the pain can bounce back unexpectedly. A quick consultation with Dr. Google will often result in a prescription of hundreds and hundreds of heel raises. While heel raises are definitely the staple of any rehab program, there are a few overlooked areas which can make a big impact on your recovery.
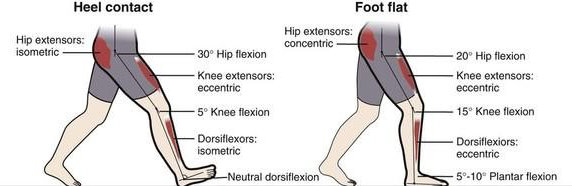 In other words, this means an inability to fully “kick back” your leg, whether it’s due to stiffness in the hip joint itself, or tightness in the muscles at the front of your hip (the hip flexors). Extending your hip back is what propels your body forward when walking or running. A loss of this forward propulsion force from your hip, means that those forces must come from somewhere else. Unfortunately, this can often place undue stress on the Achilles tendon.
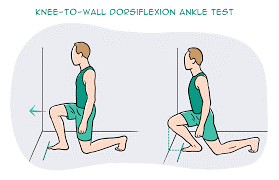 This refers to the ability of your foot to bend up towards your shin. For a quick easy way to self-assess this, try the test below. Can you fit close to a hand span between your big toe and the wall? If not, this may be a risk factor for achilles tendinopathy.
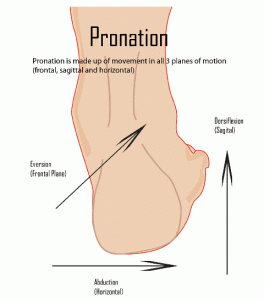 This often occurs as a secondary consequence to scenario #2. Stiffness in ankle dorsiflexion means that the extra movement at the ankle must come from elsewhere. Often this is at the joint below, called the subtalar joint. Running with the ankle moving in and out of pronation can cause excessive pulling or “wringing out” at the tendon level. It also forces your calf muscles to work harder to help keep your heel stable when running.


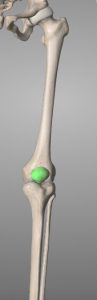 Patellofemoral Pain Syndrome
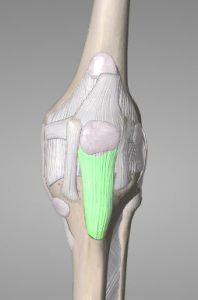 Patellar Tendonitis
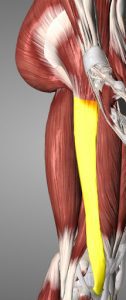 Iliotibial Band Syndrome